

تحتوي فاتورة المبيعات على معلومات بخصوص فاتورة المبيعات. يمكن عمل فواتير المبيعات مباشرة، من عرض أسعار المبيعات، ومن طلب المبيعات، ومن سند استلام البضاعة. يمكنك إضافة أو تحديث أو طباعة أو حذف فاتورة المبيعات.
إضافة فاتورة مبيعات جديدة مباشرة
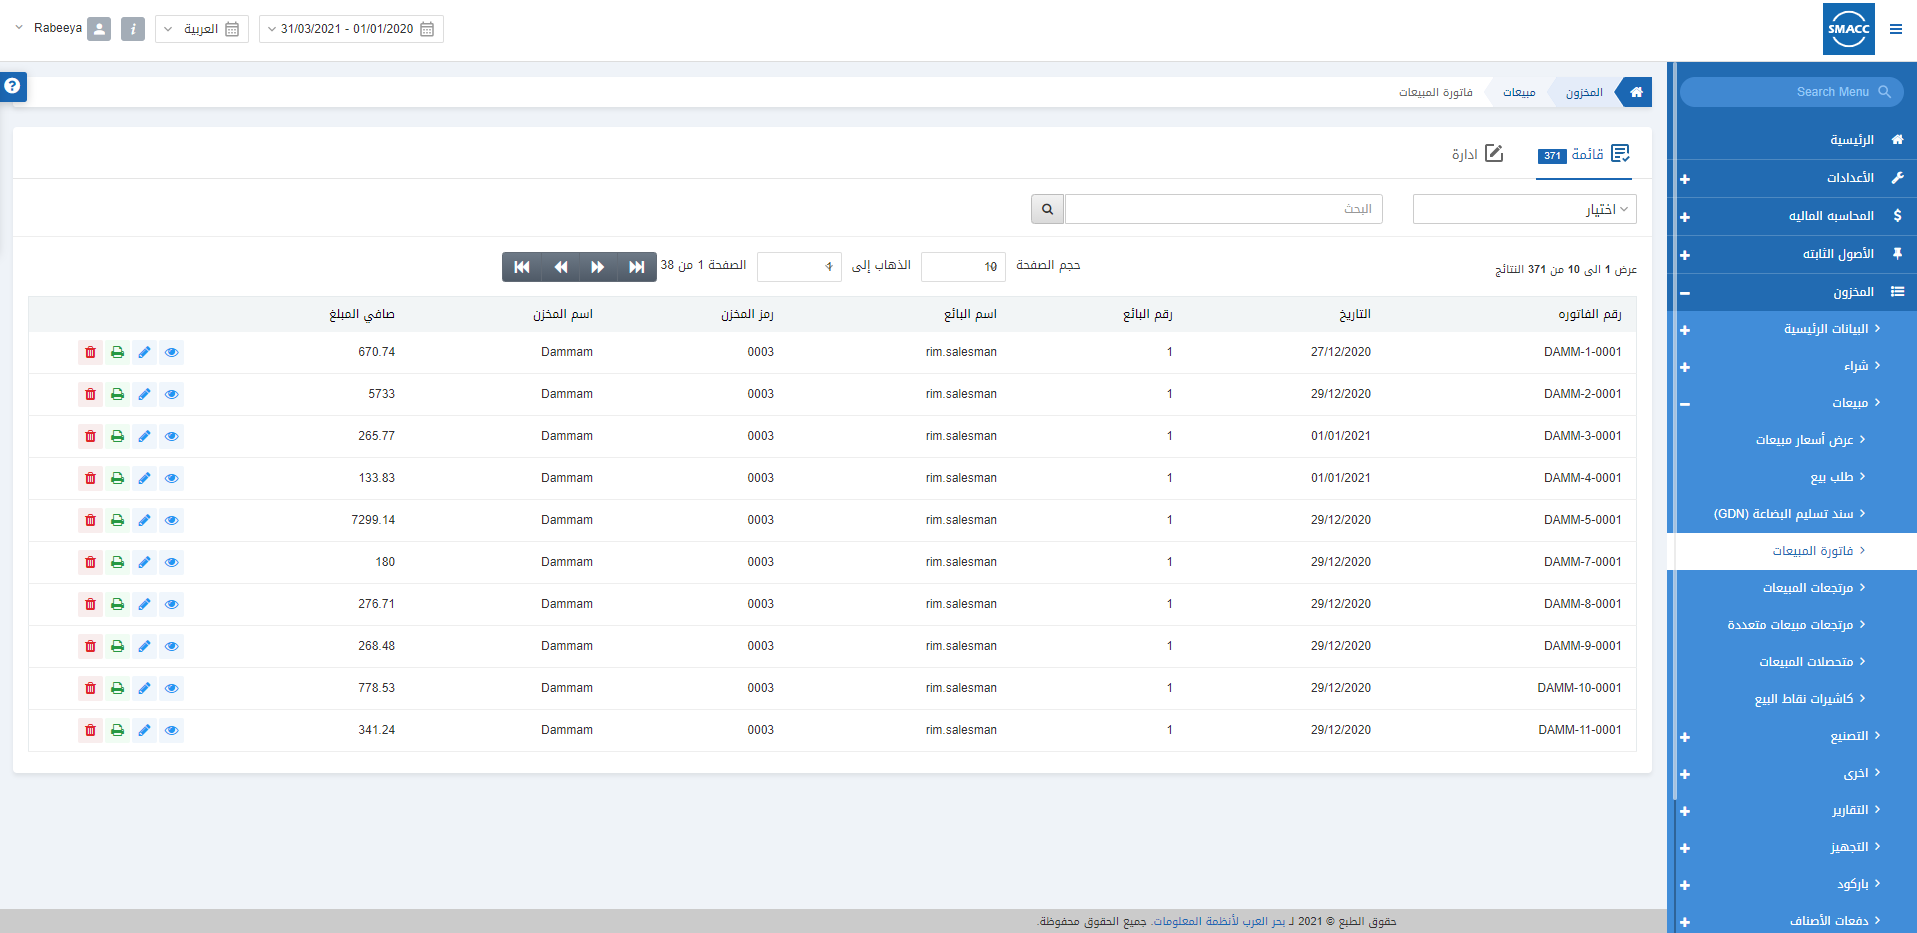
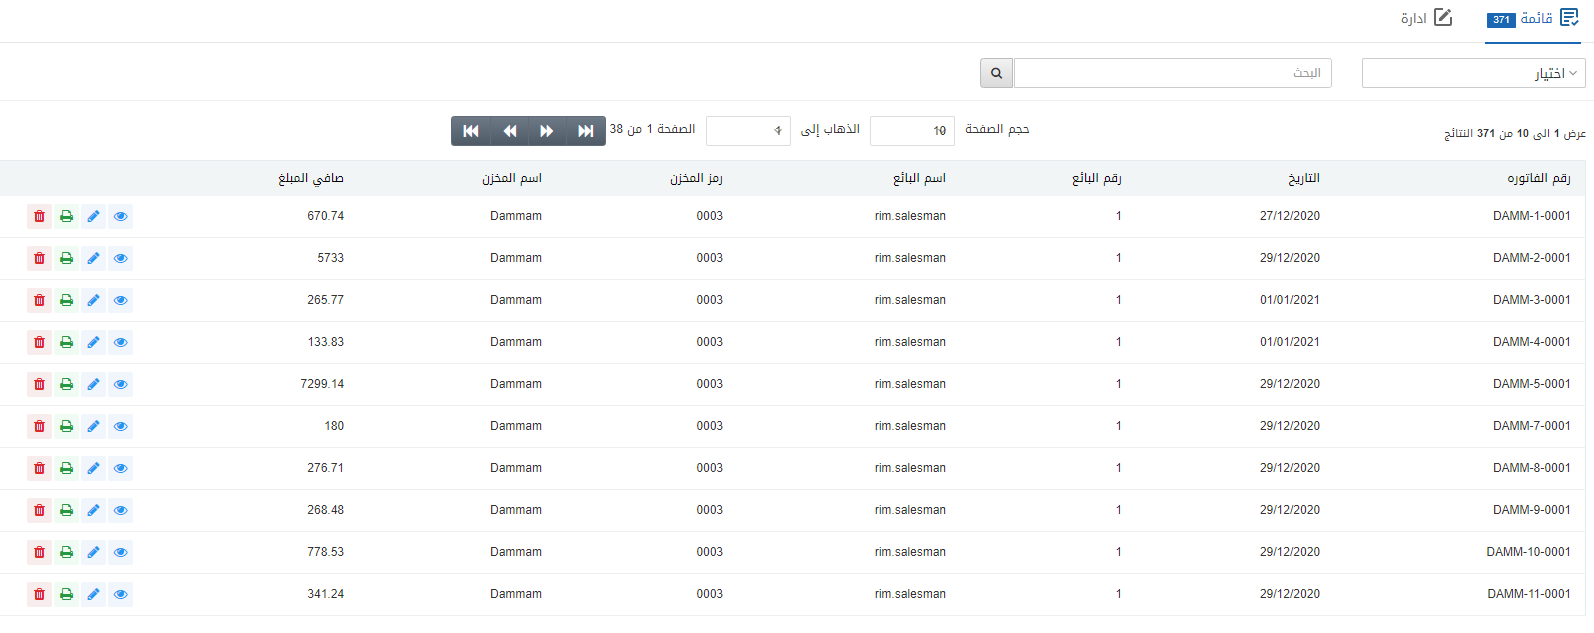
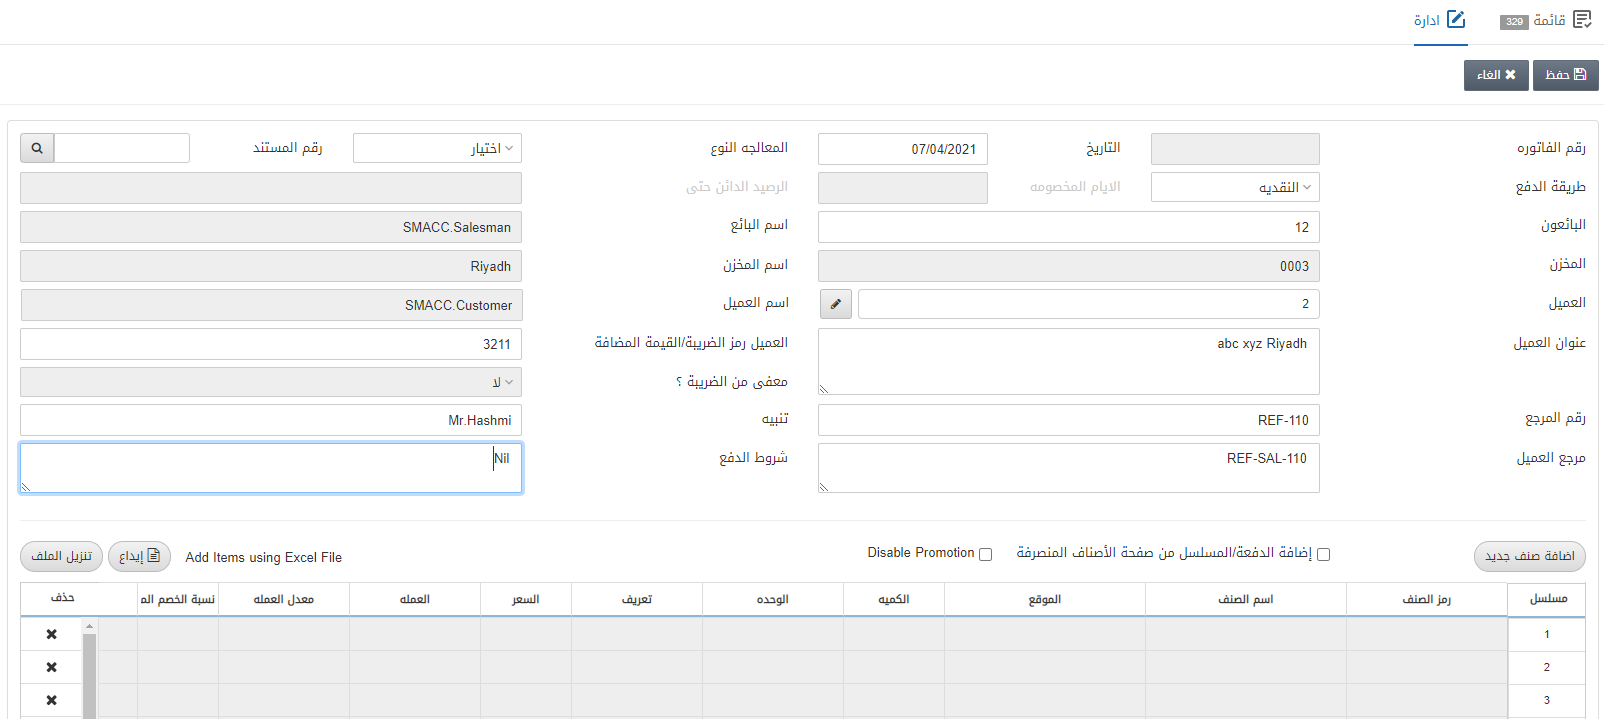
لإضافة فاتورة مبيعات مباشرة، انتقل إلى المخزون> المبيعات> فاتورة المبيعات، يتم عرض صفحة فاتورة المبيعات.
![]()
ملحوظة: تساعدك الحقول وأزرار التنقل أعلاه في عرض الصفحات مع العدد المطلوب من إدخالات فاتورة المبيعات.
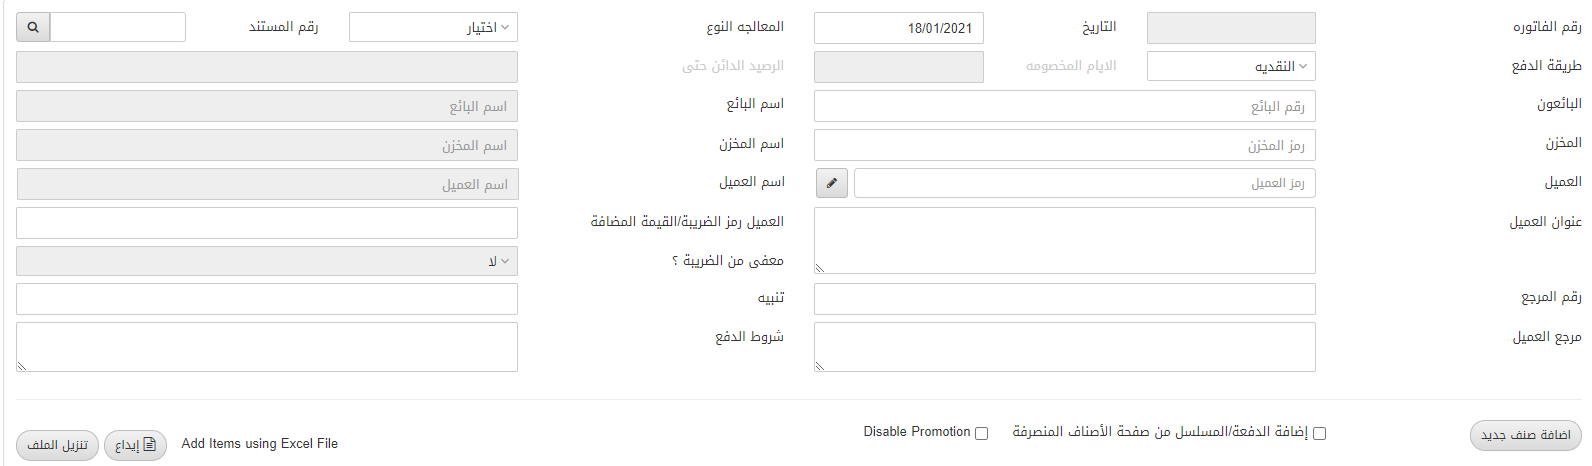
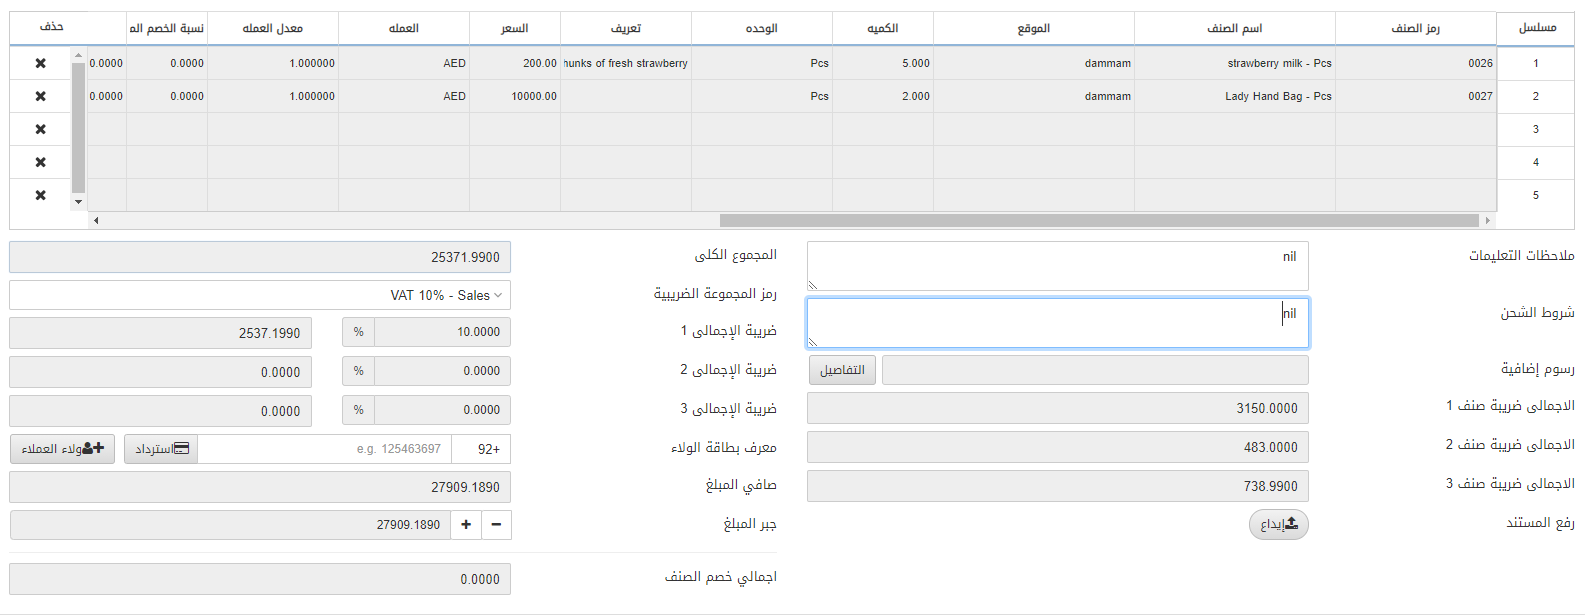
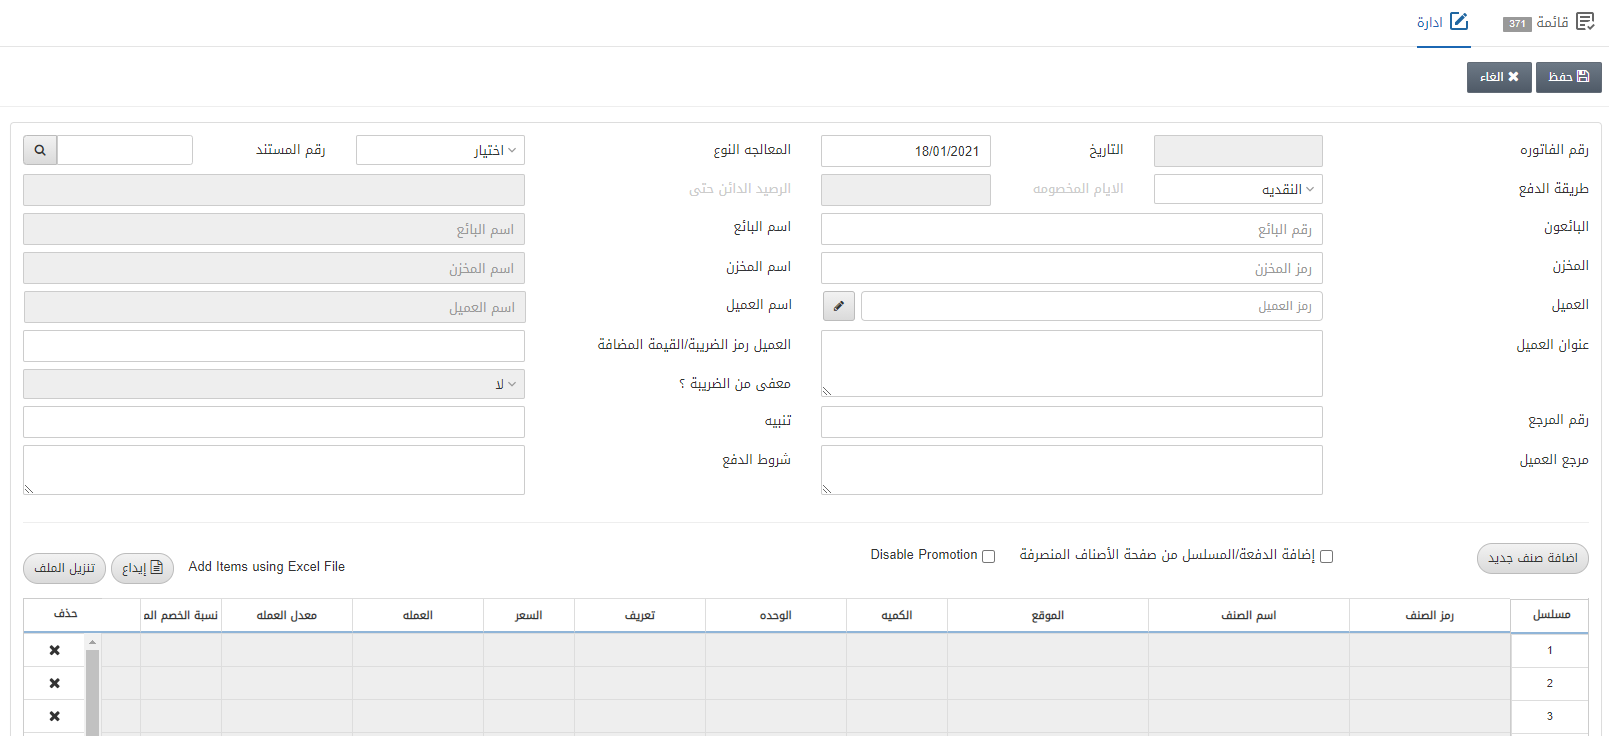
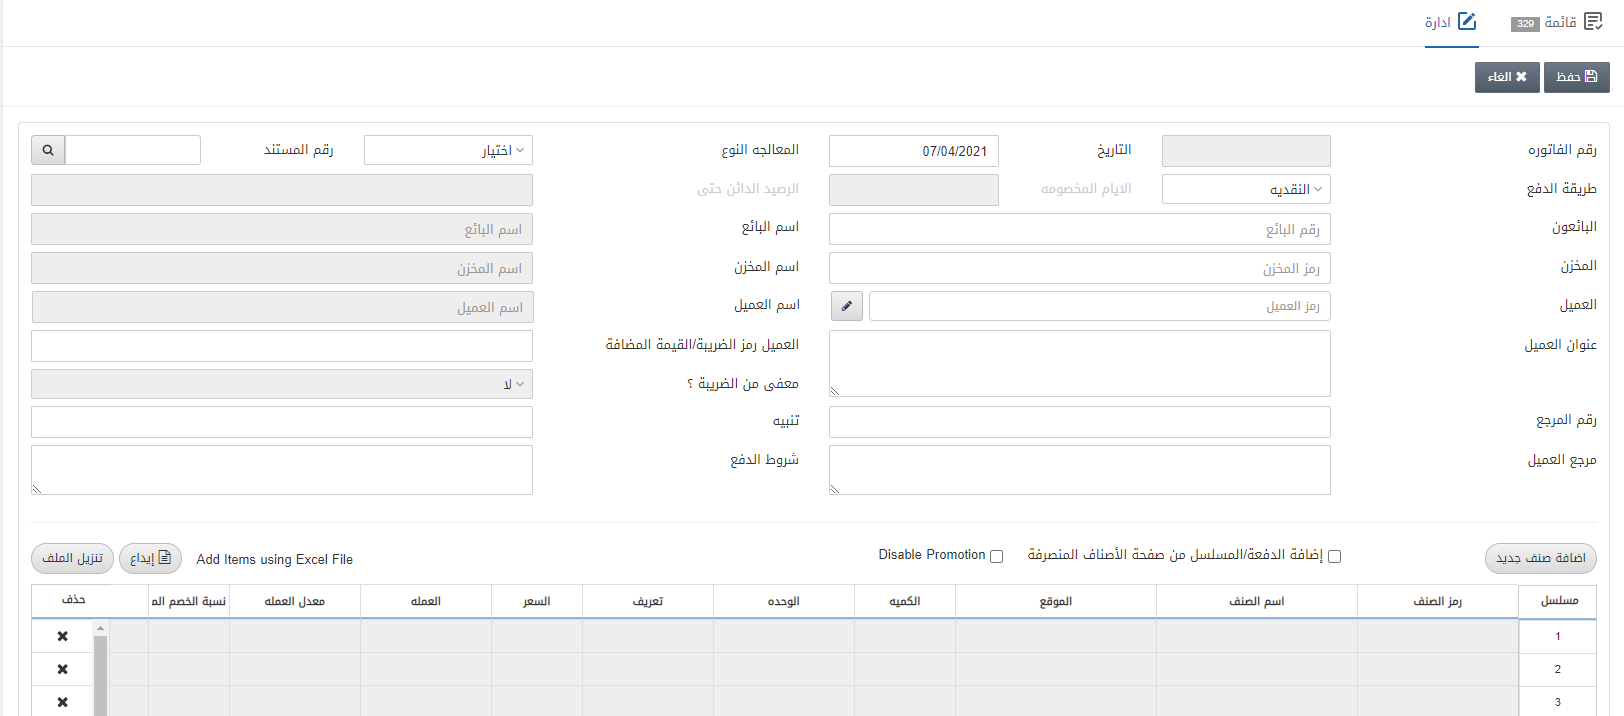
انقر فوق الزر “ادارة” في الجزء العلوي من الصفحة.

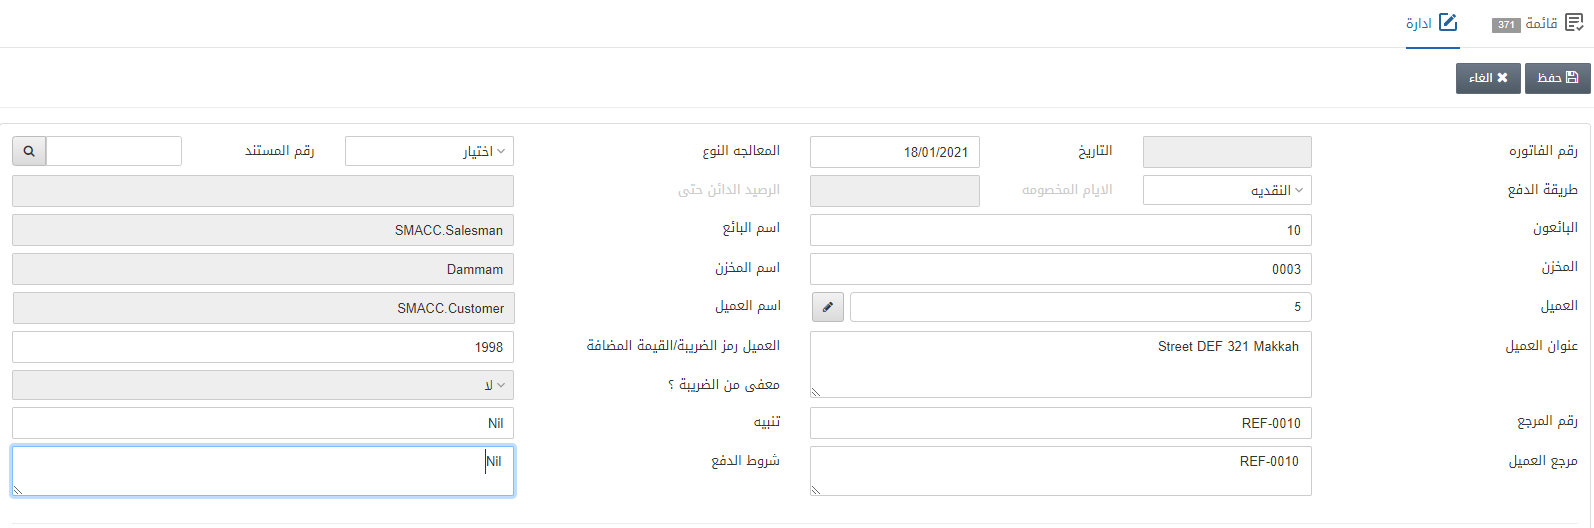
رقم الفاتورة: يتم إنشاء هذا الحقل تلقائيًا.
التاريخ: يحدد هذا الحقل تاريخ فاتورة المبيعات.
المعالجة النوع: لا تقم باختيار شيء في هذا الحقل.
رقم المستند: اترك هذا الحقل فارغا.
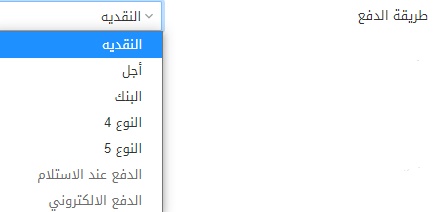
طريقة الدفع: حدد النقدية في هذا الحقل. يمكنك تحديد خيار واحد من طرق دفع متعددة مثل النقدية والاجل والبنك.
الأيام المخصومة: يتم تمكين هذا الحقل في حالة تحديد الأجل كطريقة دفع. يحدد أيام أو مدة الائتمان.
الرصيد الدائن حتى: يتم تمكين هذا الحقل في حالة تحديد الأجل كطريقة دفع. يحدد تاريخ انتهاء مدة الائتمان.
البائعون: يسمح هذا الحقل باختيار بائع من القائمة المنسدلة.
اسم البائع: يتم جلب هذا الحقل تلقائيًا بواسطة النظام.
المخزن: يسمح هذا الحقل باختيار المخزن من القائمة المنسدلة ويظهر بشكل تلقائي في حالة ربط البائع بمخزن معين.
اسم المخزن: يتم جلب هذا الحقل تلقائيًا بواسطة النظام بناءً على رمز المخزن.
العميل: يسمح هذا الحقل باختيار العميل من القائمة المنسدلة.
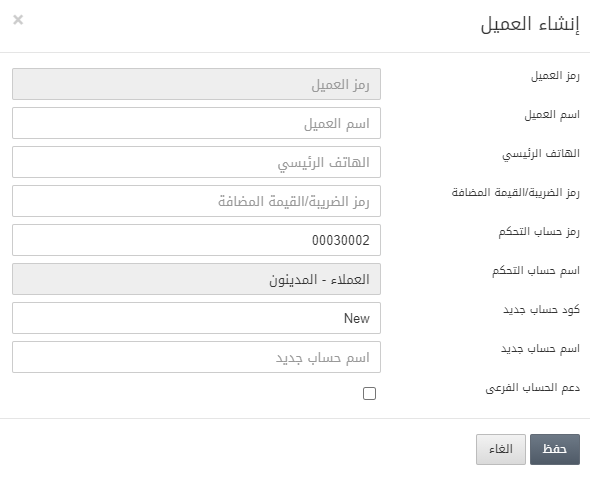
انشاء العميل: يتيح هذا الزر الموجود أمام حقل العميل إضافة عميل جديد من خلال إظهار نافذة منبثقة.
![]()

في النافذة المنبثقة أعلاه، تحتاج إلى إدخال اسم العميل، والهاتف الأساسي، و رمز ضريبة القيمة المضافة / الضريبة ، و رمز الحساب الرئيسي ، وحقل كود حساب جديد. يتم تحديد خانة الاختيار الخاصة بدعم الحساب الفرعي للسماح بالحساب الفرعي.
اسم العميل: يتم جلب هذا الحقل تلقائيًا بواسطة النظام بناءً على رمز العميل.
عنوان العميل: يحدد هذا الحقل العنوان الفعلي للعميل.
مورد رمز الضريبة/القيمة المضافة: يتم جلب هذا الحقل تلقائيًا بواسطة النظام بناءً على رمز العميل، كما يمكن إدخاله يدويًا.
معفى من الضريبة؟: يتم أيضًا جلب هذا الحقل تلقائيًا بواسطة النظام بناءً على رمز العميل.
رقم المرجع: يحدد هذا الحقل الرقم المرجعي لهذا المستند.
تنبيه: يعيّن هذا الحقل الرسالة أو التعليق او أي ملاحظات اخرى.
مرجع العميل: يحدد هذا الحقل المرجع للعميل.
شروط الدفع: يحدد هذا الحقل شروط وأحكام الدفع، إن وجدت.

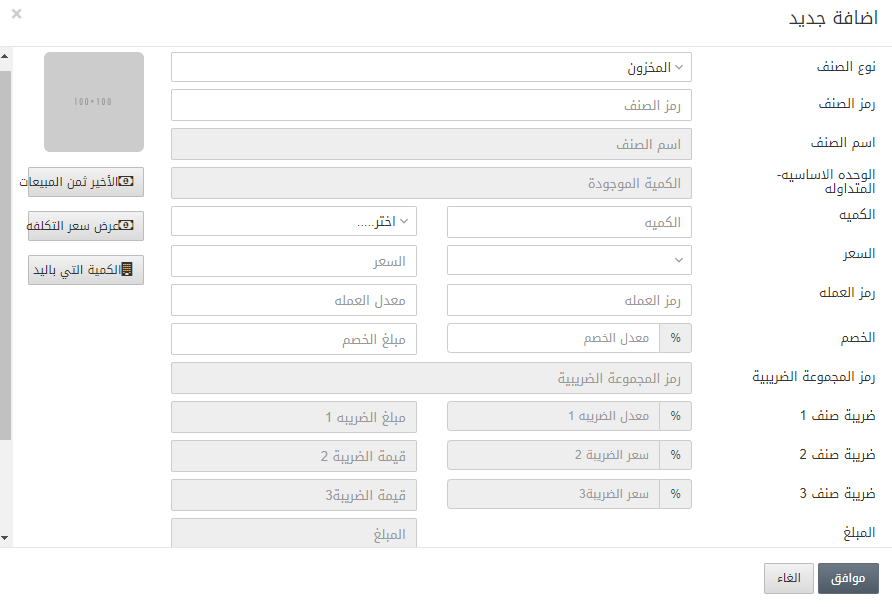
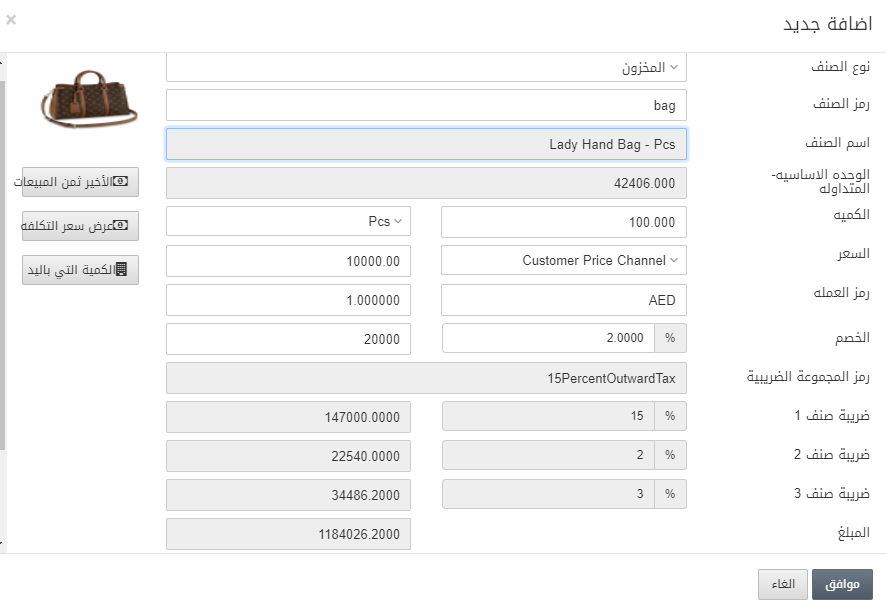
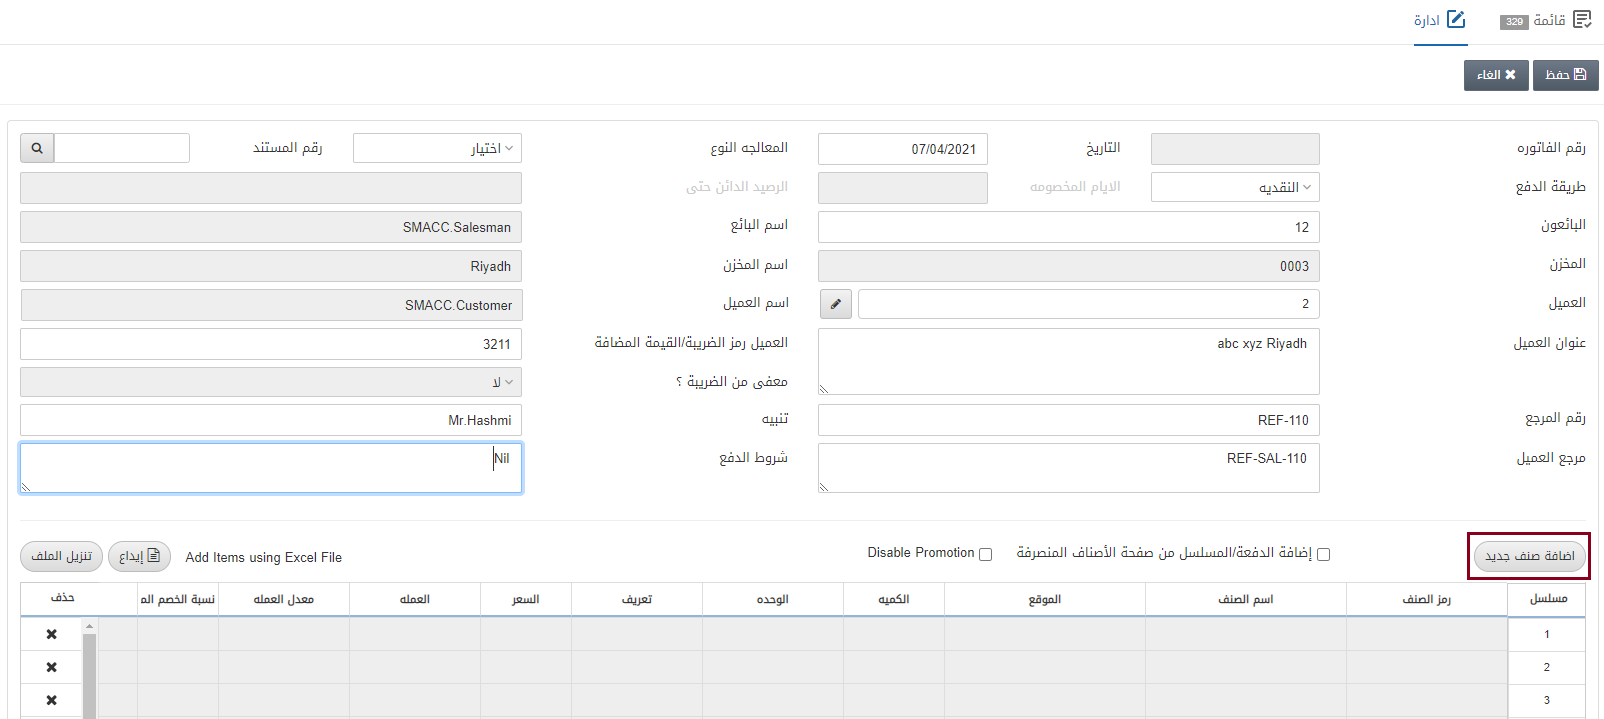
“إضافة صنف جديد”: يتيح لك هذا الزر إضافة أصناف جديدة إلى فاتورة المبيعات.
إضافة الدفعة / المسلسل من صفحة الاصناف المنصرفة: يسمح مربع الاختيار هذا بإضافة أرقام دُفعات / تسلسلية من صفحة الاصناف المنصرفة من المخزون. هذا يعني أن تحديد مربع الاختيار هذا يتيح ميزة الأرقام التسلسلية والدُفعات.
تعطيل العروض: مربع الاختيار هذا عند تحديده يؤدي إلى تعطيل العروض الترويجية. عند عدم التحديد، يتم تمكين العروض في فاتورة المبيعات.
الخيار الأول: الإضافة المباشرة للأصناف.

انقر فوق الزر “إضافة صنف جديد”.
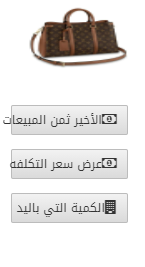
الأخير ثمن المبيعات: يعرض هذا الزر عند النقر فوقه آخر سعر بيع للصنف.
إظهار سعر التكلفة: يظهر هذا الزر عند النقر فوقه سعر تكلفة الصنف.
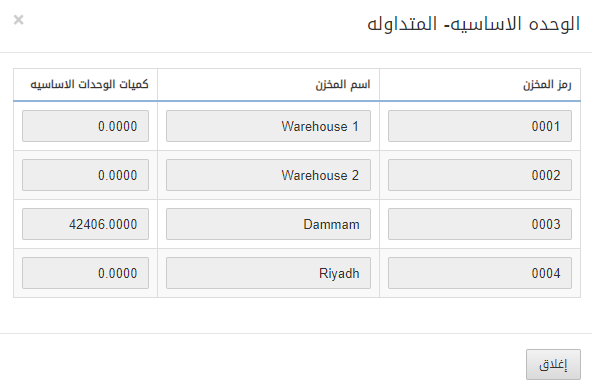
الكمية التي باليد: يظهر هذا الزر عند النقر عليه كمية الوحدة الأساسية في جميع المخازن.
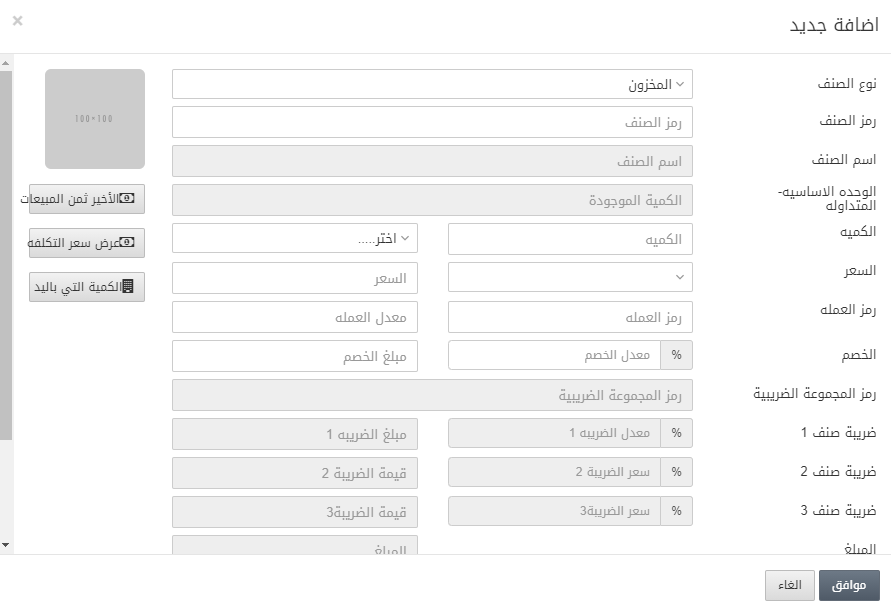
نوع الصنف: يحدد هذا الحقل نوع الصنف من القائمة المنسدلة، مثل المخزون والخدمة ومجموعات البيع.
رمز الصنف: يحدد هذا الحقل رمز الصنف إما من القائمة المنسدلة أو بإدخال رمز صنف معين.
الكمية: يحدد هذا الحقل عدد الأصناف التي سيتم تحديدها. الوحدة: أمام الكمية يوجد حقل الوحدة.
الخصم: معدل الخصم يحدد النسبة المئوية للخصم على أحد الأصناف.
تعريف: يعيّن هذا الحقل المعلومات التفصيلية الإضافية حول الصنف.
انقر فوق الزر “موافق” لحفظ المعلومات.

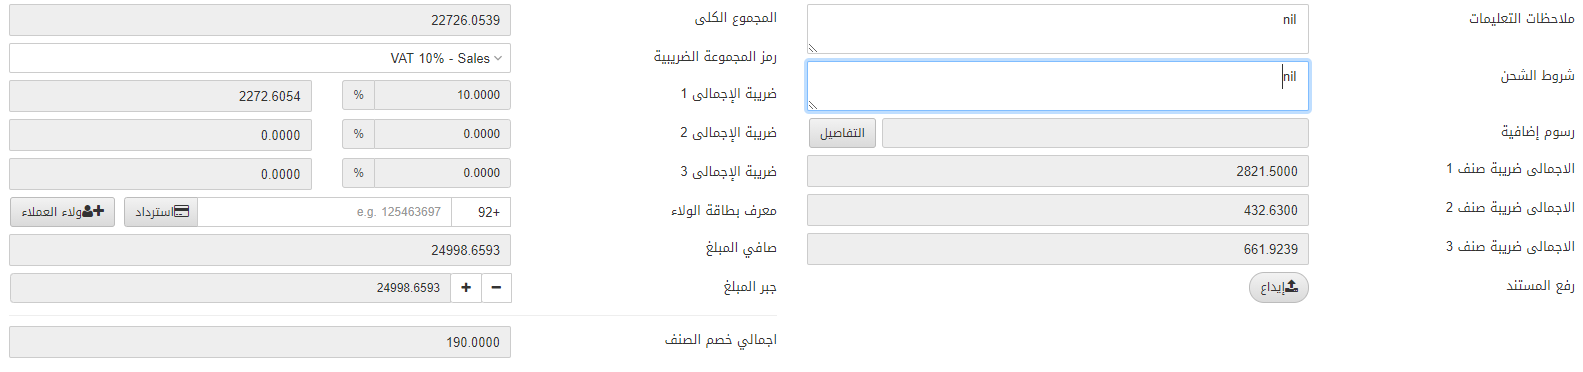
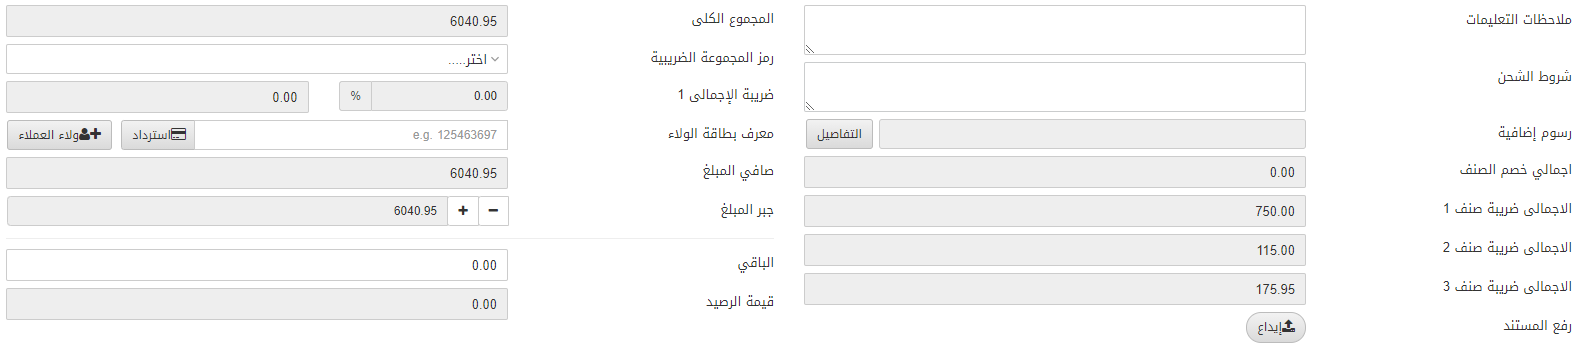
ملاحظات التعليمات: يحدد هذا الحقل الإرشادات أو التعليقات او الملاحظات.
رمز المجموعة الضريبية: يسمح هذا الحقل باختيار الضريبة الاجمالية إن وجدت.
شروط الشحن: يحدد هذا الحقل شروط وأحكام الشحن ان وجدت.
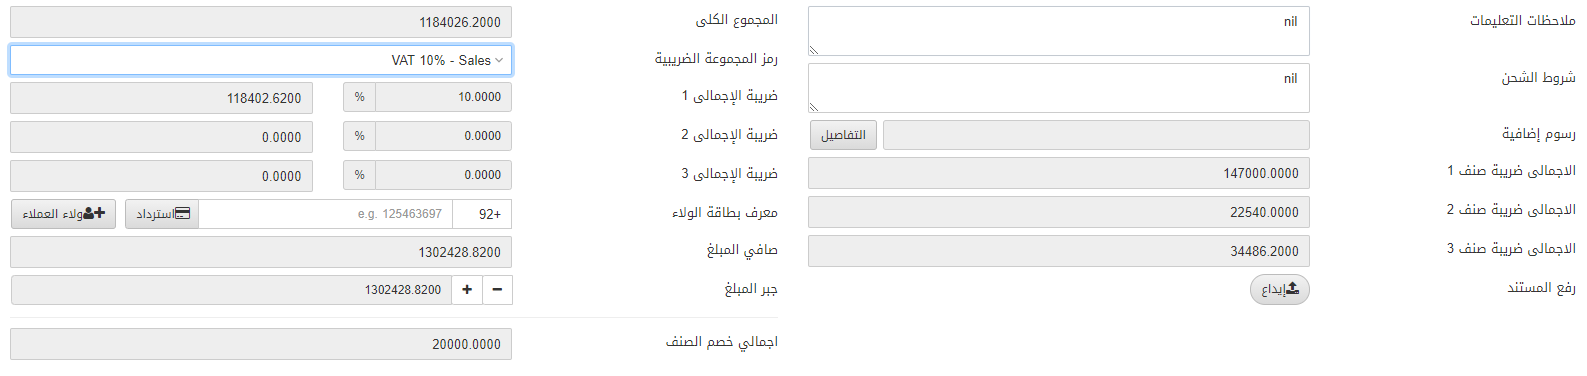
الرسوم الإضافية: يحدد هذا الحقل الرسوم الإضافية.
![]()
التفاصيل: يؤدي النقر فوق هذا الزر إلى إظهار نافذة منبثقة لإدخال تفاصيل الرسوم الاضافية.
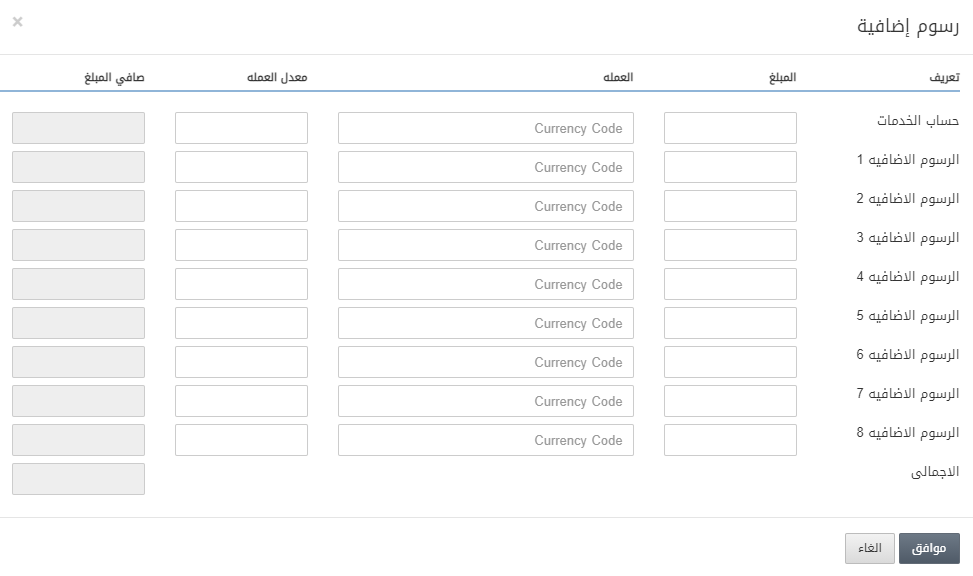
في النافذة المنبثقة، يمكنك إضافة رسوم الخدمات والرسوم الإضافية من 1 إلى 8 جنبًا إلى جنب مع رموز العملات وأسعار العملات، وبالتالي إضافة هذه الرسوم إلى إجمالي المبلغ الصافي.
معرف بطاقة الولاء: في حالة عميل الولاء، تقوم بإدخال معرف بطاقة الولاء إذا كان العميل يريد استخدامه في فاتورة المبيعات. يجب عليك إدخال رقم هاتف العميل كمعرف بطاقة ولاء.
![]()
استرداد: بالنقر فوق هذا الزر، يمكنك الاستفادة من نقاط ولاء العميل.
ولاء العملاء: بالنقر فوق هذا الزر يمكنك إضافة عملاء الولاء.
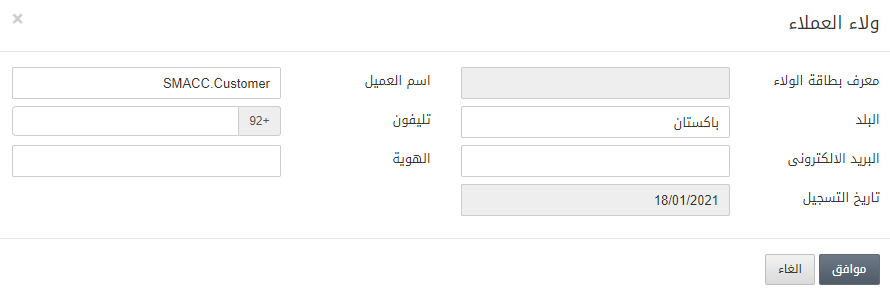
ملاحظة: يمكنك إضافة عميل الولاء عن طريق إدخال البلد ورقم الهاتف والبريد الإلكتروني والمعرف. يجب أن يكون رقم الهاتف فريدًا. مطلوب كلمة مرور لمرة واحدة (OTP) للتحقق من رقم الهاتف الصحيح لمستخدم بطاقة الولاء.
جبر المبلغ: يمكنك تقريب المبلغ بالنقر فوق الزر “+” أو “-“.

ملاحظة: في كل مرة يتم فيها النقر الزر + أو -، يتم تقريب المبلغ على التوالي. والغرض من ذلك هو الحصول على مبلغ بدون كسر عشري يمكن دفعه
الباقي – المدفوع: هذا هو المبلغ الذي يدفعه العميل.
قيمة الرصيد: هذا هو المبلغ المتبقي من النقدية ليتم تسليمها للعميل بعد طرح المبلغ الإجمالي للفاتورة من المبلغ المدفوع

رفع المستند: يتيح لك هذا الزر تحميل الصور الممسوحة ضوئيًا للفاتورة أو أي صور أو ملفات أخرى ذات صلة.
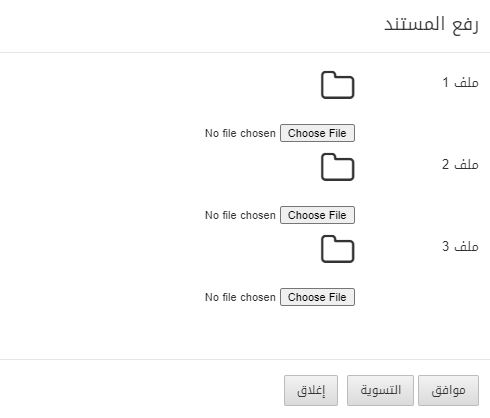
يمكنك اختيار ملفات الصور وحفظ الصور بالضغط على زر “موافق”.
بمجرد تحميل المستند، انقر فوق الزر “حفظ” في أعلى الصفحة لحفظ المعلومات.
الخيار الثاني: إضافة الأصناف من ملف اكسيل:
![]()
انقر فوق الزر “تنزيل الملف” أولا.
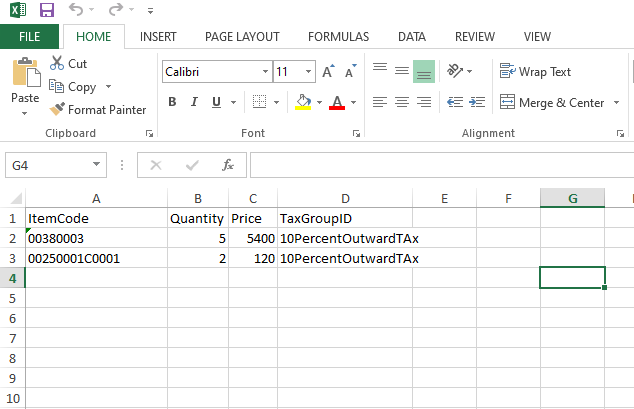
قم بإضافة المزيد من الأصناف حسب المتطلبات في ملف Excel الذي تم تنزيله.
احفظ الآن هذا الملف الذي تم تنزيله بعد التحرير على سطح المكتب. قم بتحميل نفس الملف بالنقر فوق الزر “إيداع”.
![]()
ملاحظات التعليمات: يحدد هذا الحقل الإرشادات أو التعليقات او الملاحظات.
رمز المجموعة الضريبية: يسمح هذا الحقل باختيار الضريبة الاجمالية إن وجدت.
شروط الشحن: يحدد هذا الحقل شروط وأحكام الشحن ان وجدت.
الرسوم الإضافية: يحدد هذا الحقل الرسوم الإضافية.
![]()
التفاصيل: يؤدي النقر فوق هذا الزر إلى إظهار نافذة منبثقة لإدخال تفاصيل الرسوم الاضافية.
في النافذة المنبثقة، يمكنك إضافة رسوم الخدمات والرسوم الإضافية من 1 إلى 8 جنبًا إلى جنب مع رموز العملات وأسعار العملات، وبالتالي إضافة هذه الرسوم إلى إجمالي المبلغ الصافي.
معرف بطاقة الولاء: في حالة عميل الولاء، تقوم بإدخال معرف بطاقة الولاء إذا كان العميل يريد استخدامه في فاتورة المبيعات. يجب عليك إدخال رقم هاتف العميل كمعرف بطاقة ولاء.
![]()
استرداد: بالنقر فوق هذا الزر، يمكنك الاستفادة من نقاط ولاء العميل.
ولاء العملاء: بالنقر فوق هذا الزر يمكنك إضافة عملاء الولاء.
ملاحظة: يمكنك إضافة عميل الولاء عن طريق إدخال البلد ورقم الهاتف والبريد الإلكتروني والمعرف. يجب أن يكون رقم الهاتف فريدًا. مطلوب كلمة مرور لمرة واحدة (OTP) للتحقق من رقم الهاتف الصحيح لمستخدم بطاقة الولاء.
جبر المبلغ: يمكنك تقريب المبلغ بالنقر فوق الزر “+” أو “-“.
ملاحظة: في كل مرة يتم فيها النقر الزر + أو -، يتم تقريب المبلغ على التوالي. والغرض من ذلك هو الحصول على مبلغ بدون كسر عشري يمكن دفعه
الباقي – المدفوع: هذا هو المبلغ الذي يدفعه العميل.
قيمة الرصيد: هذا هو المبلغ المتبقي من النقدية ليتم تسليمها للعميل بعد طرح المبلغ الإجمالي للفاتورة من المبلغ المدفوع
رفع المستند: يتيح لك هذا الزر تحميل الصور الممسوحة ضوئيًا للفاتورة أو أي صور أو ملفات أخرى ذات صلة.
يمكنك اختيار ملفات الصور وحفظ الصور بالضغط على زر “موافق”.
بمجرد تحميل المستند، انقر فوق الزر “حفظ” في أعلى الصفحة لحفظ المعلومات.
إضافة فاتورة مبيعات من عرض أسعار المبيعات
لإضافة فاتورة مبيعات من عرض أسعار المبيعات، انتقل إلى المخزون> المبيعات> فاتورة المبيعات، يتم عرض صفحة فاتورة المبيعات.

![]()
انقر فوق الزر “ادارة” في الجزء العلوي من الصفحة.
رقم الفاتورة: يتم إنشاء هذا الحقل تلقائيًا.
التاريخ: يحدد هذا الحقل تاريخ فاتورة المبيعات.
المعالجة النوع: في هذا الحقل اختر عرض أسعار المبيعات.
رقم المستند: ادخل رقم عرض السعر.
طريقة الدفع: حدد النقدية في هذا الحقل. يمكنك تحديد خيار واحد من طرق دفع متعددة مثل النقدية والاجل والبنك.
الأيام المخصومة: يتم تمكين هذا الحقل في حالة تحديد الأجل كطريقة دفع. يحدد أيام أو مدة الائتمان.
الرصيد الدائن حتى: يتم تمكين هذا الحقل في حالة تحديد الأجل كطريقة دفع. يحدد تاريخ انتهاء مدة الائتمان.
البائعون: يسمح هذا الحقل باختيار بائع من القائمة المنسدلة.
اسم البائع: يتم جلب هذا الحقل تلقائيًا بواسطة النظام.
المخزن: يسمح هذا الحقل باختيار المخزن من القائمة المنسدلة ويظهر بشكل تلقائي في حالة ربط البائع بمخزن معين.
اسم المخزن: يتم جلب هذا الحقل تلقائيًا بواسطة النظام بناءً على رمز المخزن.
العميل: يسمح هذا الحقل باختيار العميل من القائمة المنسدلة.
انشاء العميل: يتيح هذا الزر الموجود أمام حقل العميل إضافة عميل جديد من خلال إظهار نافذة منبثقة.
![]()
في النافذة المنبثقة أعلاه، تحتاج إلى إدخال اسم العميل، والهاتف الأساسي، ورمز ضريبة القيمة المضافة / الضريبة، ورمز الحساب الرئيسي، وحقل كود حساب جديد. يتم تحديد خانة الاختيار الخاصة بدعم الحساب الفرعي للسماح بالحساب الفرعي.
اسم العميل: يتم جلب هذا الحقل تلقائيًا بواسطة النظام بناءً على رمز العميل.
عنوان العميل: يحدد هذا الحقل العنوان الفعلي للعميل.
مورد رمز الضريبة/القيمة المضافة: يتم جلب هذا الحقل تلقائيًا بواسطة النظام بناءً على رمز العميل، كما يمكن إدخاله يدويًا.
معفى من الضريبة؟: يتم أيضًا جلب هذا الحقل تلقائيًا بواسطة النظام بناءً على رمز العميل.
رقم المرجع: يحدد هذا الحقل الرقم المرجعي لهذا المستند.
تنبيه: يعيّن هذا الحقل الرسالة أو التعليق او أي ملاحظات اخرى.
مرجع العميل: يحدد هذا الحقل المرجع للعميل.
شروط الدفع: يحدد هذا الحقل شروط وأحكام الدفع، إن وجدت.
![]()
انقر فوق الزر “بحث” أمام رقم عرض السعر.
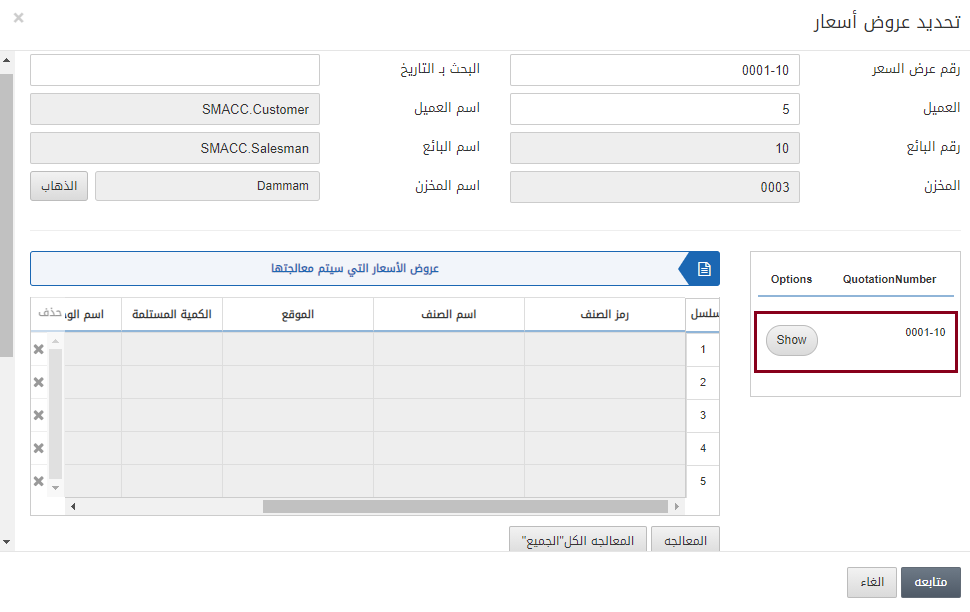
انقر فوق الزر “عرض” وأدخل الكمية للأصناف.
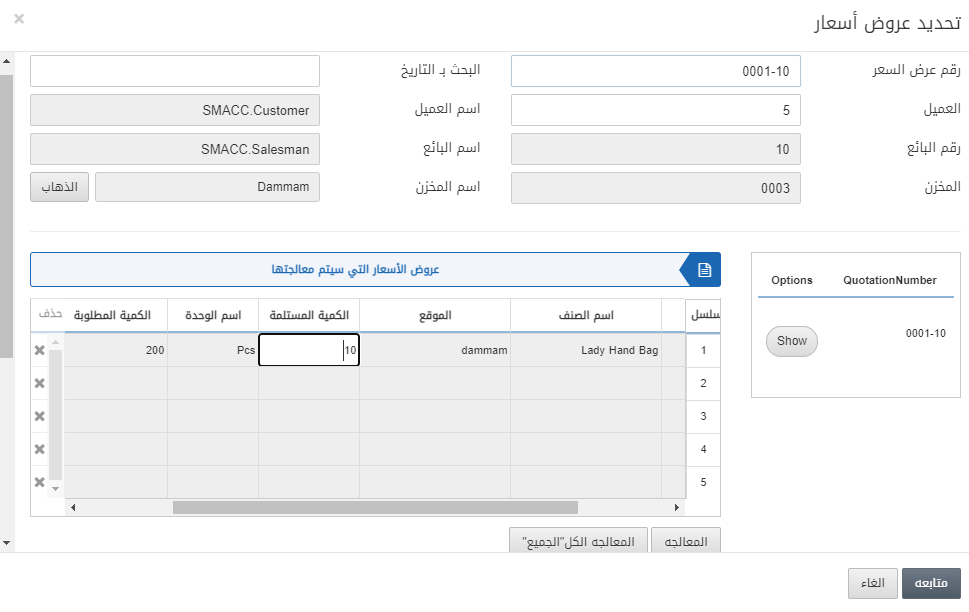
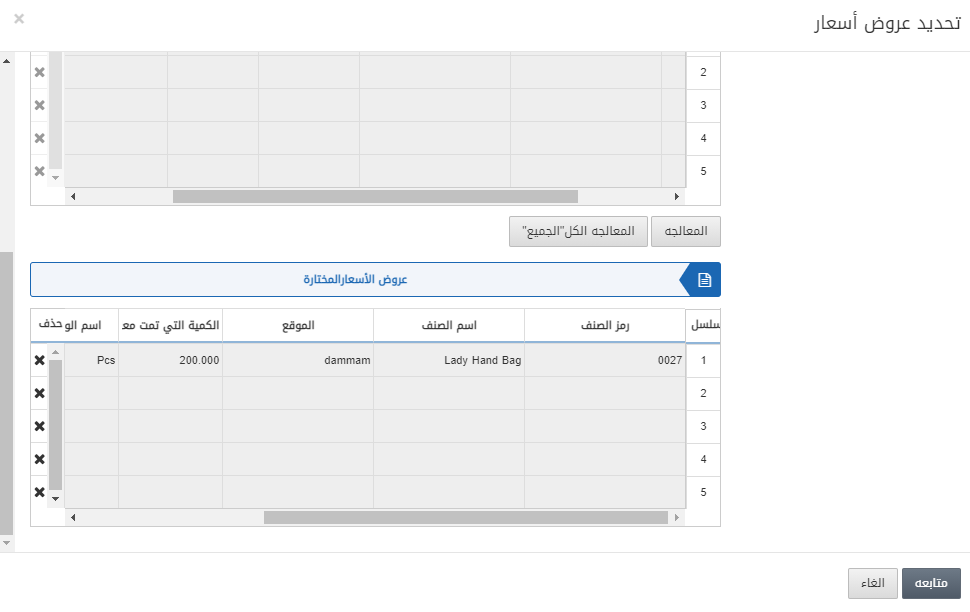
انقر فوق الزر “المعالجة الكل. الجميع” لمعالجة الاصناف المضافة.
انقر فوق الزر “متابعة” لحفظ المعلومات.


ملاحظات التعليمات: يحدد هذا الحقل الإرشادات أو التعليقات او الملاحظات.
رمز المجموعة الضريبية: يسمح هذا الحقل باختيار الضريبة الاجمالية إن وجدت.
شروط الشحن: يحدد هذا الحقل شروط وأحكام الشحن ان وجدت.
الرسوم الإضافية: يحدد هذا الحقل الرسوم الإضافية.
![]()
التفاصيل: يؤدي النقر فوق هذا الزر إلى إظهار نافذة منبثقة لإدخال تفاصيل الرسوم الاضافية.
في النافذة المنبثقة، يمكنك إضافة رسوم الخدمات والرسوم الإضافية من 1 إلى 8 جنبًا إلى جنب مع رموز العملات وأسعار العملات، وبالتالي إضافة هذه الرسوم إلى إجمالي المبلغ الصافي.
معرف بطاقة الولاء: في حالة عميل الولاء، تقوم بإدخال معرف بطاقة الولاء إذا كان العميل يريد استخدامه في فاتورة المبيعات. يجب عليك إدخال رقم هاتف العميل كمعرف بطاقة ولاء.
![]()
استرداد: بالنقر فوق هذا الزر، يمكنك الاستفادة من نقاط ولاء العميل.
ولاء العملاء: بالنقر فوق هذا الزر يمكنك إضافة عملاء الولاء.
ملاحظة: يمكنك إضافة عميل الولاء عن طريق إدخال البلد ورقم الهاتف والبريد الإلكتروني والمعرف. يجب أن يكون رقم الهاتف فريدًا. مطلوب كلمة مرور لمرة واحدة (OTP) للتحقق من رقم الهاتف الصحيح لمستخدم بطاقة الولاء.
جبر المبلغ: يمكنك تقريب المبلغ بالنقر فوق الزر “+” أو “-“.
ملاحظة: في كل مرة يتم فيها النقر الزر + أو -، يتم تقريب المبلغ على التوالي. والغرض من ذلك هو الحصول على مبلغ بدون كسر عشري يمكن دفعه
الباقي – المدفوع: هذا هو المبلغ الذي يدفعه العميل.
قيمة الرصيد: هذا هو المبلغ المتبقي من النقدية ليتم تسليمها للعميل بعد طرح المبلغ الإجمالي للفاتورة من المبلغ المدفوع
إضافة فاتورة مبيعات بواسطة طلب البيع
لإضافة فاتورة مبيعات بواسطة طلب البيع، انتقل إلى المخزون> المبيعات> فاتورة المبيعات، يتم عرض صفحة فاتورة المبيعات.

![]()
انقر فوق الزر “ادارة” في الجزء العلوي من الصفحة.

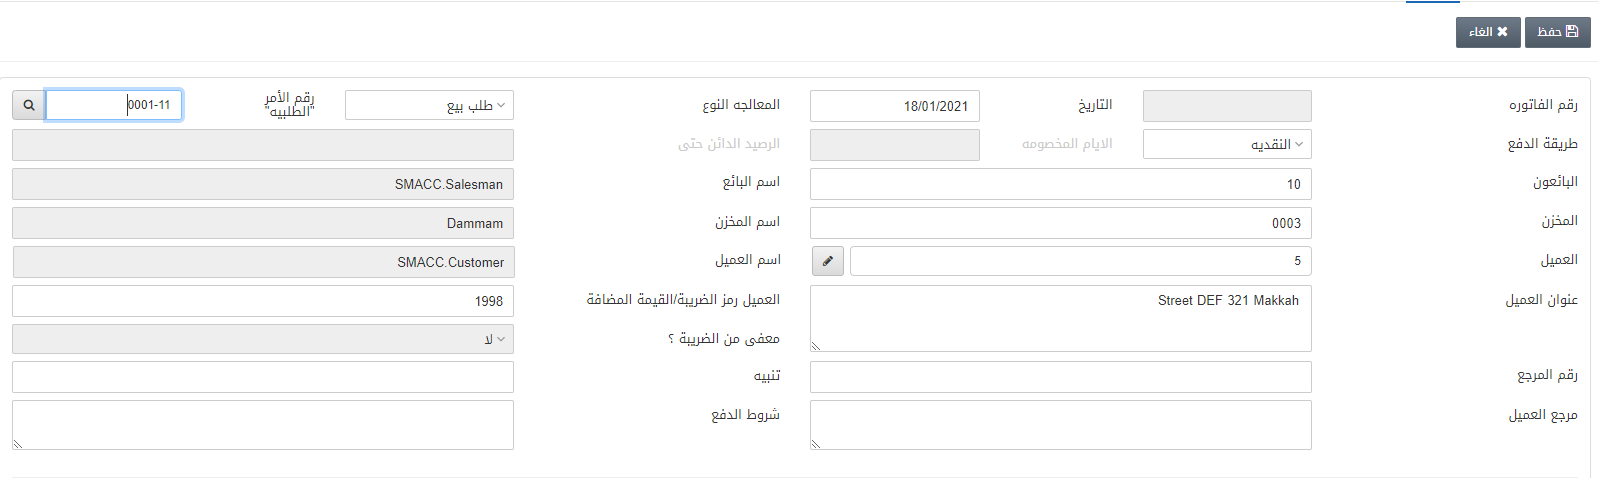
رقم الفاتورة: يتم إنشاء هذا الحقل تلقائيًا.
التاريخ: يحدد هذا الحقل تاريخ فاتورة المبيعات.
المعالجة النوع: في هذا الحقل اختر طلب البيع.
رقم المستند: ادخل رقم الامر “الطلبية”.
طريقة الدفع: حدد النقدية في هذا الحقل. يمكنك تحديد خيار واحد من طرق دفع متعددة مثل النقدية والاجل والبنك.
الأيام المخصومة: يتم تمكين هذا الحقل في حالة تحديد الأجل كطريقة دفع. يحدد أيام أو مدة الائتمان.
الرصيد الدائن حتى: يتم تمكين هذا الحقل في حالة تحديد الأجل كطريقة دفع. يحدد تاريخ انتهاء مدة الائتمان.
البائعون: يسمح هذا الحقل باختيار بائع من القائمة المنسدلة.
اسم البائع: يتم جلب هذا الحقل تلقائيًا بواسطة النظام.
المخزن: يسمح هذا الحقل باختيار المخزن من القائمة المنسدلة ويظهر بشكل تلقائي في حالة ربط البائع بمخزن معين.
اسم المخزن: يتم جلب هذا الحقل تلقائيًا بواسطة النظام بناءً على رمز المخزن.
العميل: يسمح هذا الحقل باختيار العميل من القائمة المنسدلة.
انشاء العميل: يتيح هذا الزر الموجود أمام حقل العميل إضافة عميل جديد من خلال إظهار نافذة منبثقة.![]()
في النافذة المنبثقة أعلاه، تحتاج إلى إدخال اسم العميل، والهاتف الأساسي، ورمز ضريبة القيمة المضافة / الضريبة، ورمز الحساب الرئيسي، وحقل كود حساب جديد. يتم تحديد خانة الاختيار الخاصة بدعم الحساب الفرعي للسماح بالحساب الفرعي.
اسم العميل: يتم جلب هذا الحقل تلقائيًا بواسطة النظام بناءً على رمز العميل.
عنوان العميل: يحدد هذا الحقل العنوان الفعلي للعميل.
مورد رمز الضريبة/القيمة المضافة: يتم جلب هذا الحقل تلقائيًا بواسطة النظام بناءً على رمز العميل، كما يمكن إدخاله يدويًا.
معفى من الضريبة؟: يتم أيضًا جلب هذا الحقل تلقائيًا بواسطة النظام بناءً على رمز العميل.
رقم المرجع: يحدد هذا الحقل الرقم المرجعي لهذا المستند.
تنبيه: يعيّن هذا الحقل الرسالة أو التعليق او أي ملاحظات اخرى.
مرجع العميل: يحدد هذا الحقل المرجع للعميل.
شروط الدفع: يحدد هذا الحقل شروط وأحكام الدفع، إن وجدت.
![]()
انقر فوق الزر “بحث” أمام رقم الامر “الطلبية”.
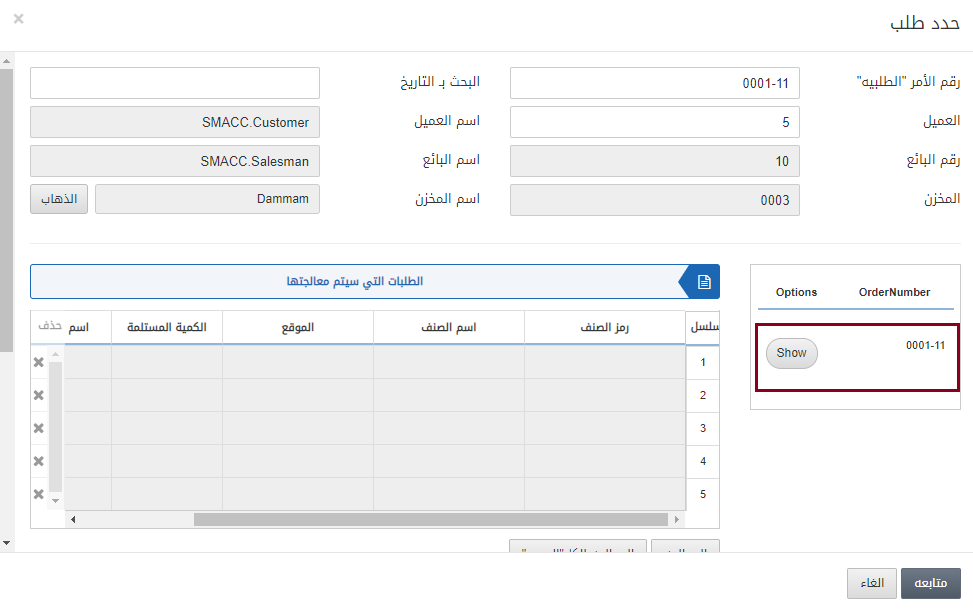
انقر فوق الزر “عرض” وأدخل الكمية للأصناف.
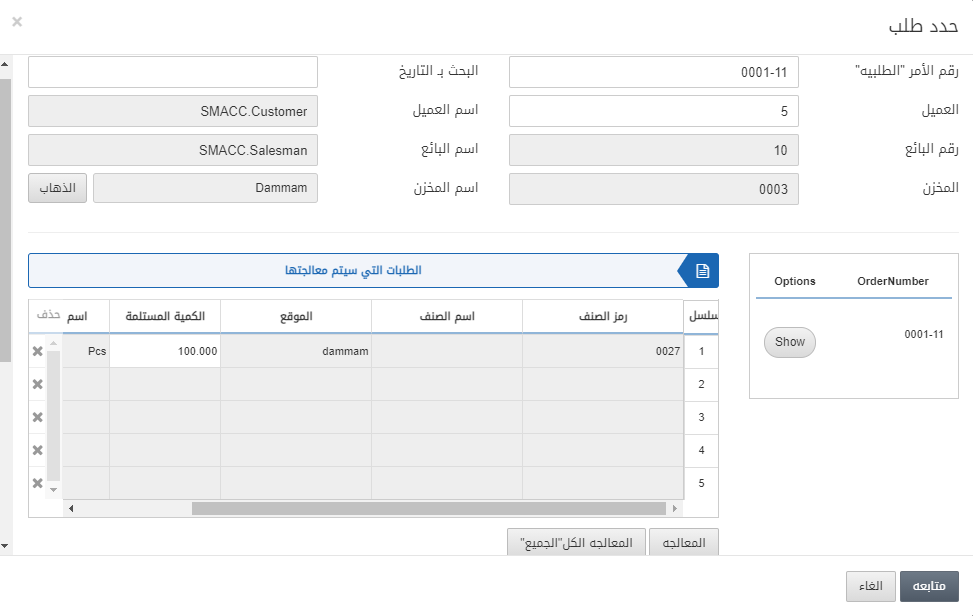
انقر فوق الزر “المعالجة الكل. الجميع” لمعالجة الاصناف المضافة.
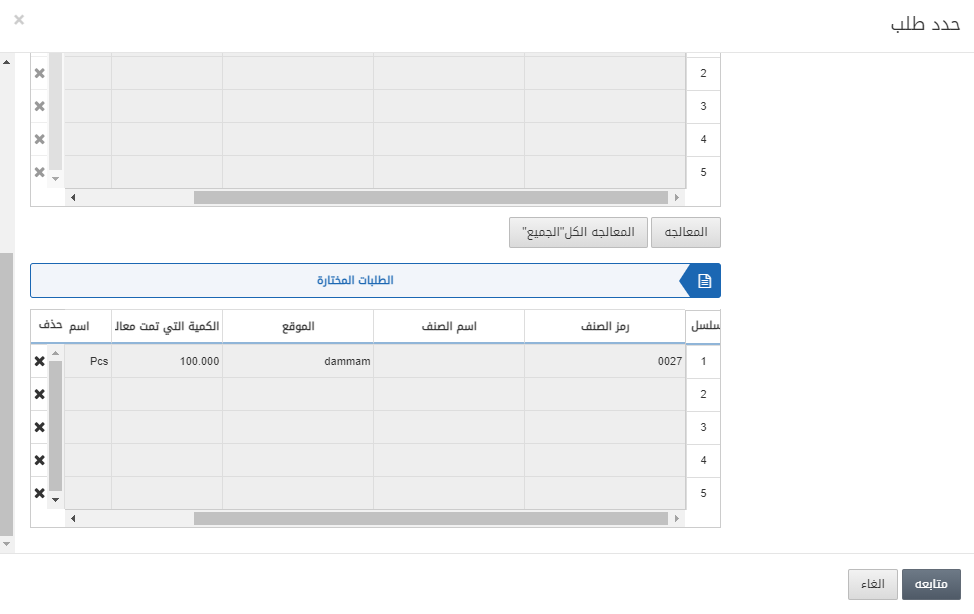
انقر فوق الزر “متابعة” لحفظ المعلومات.

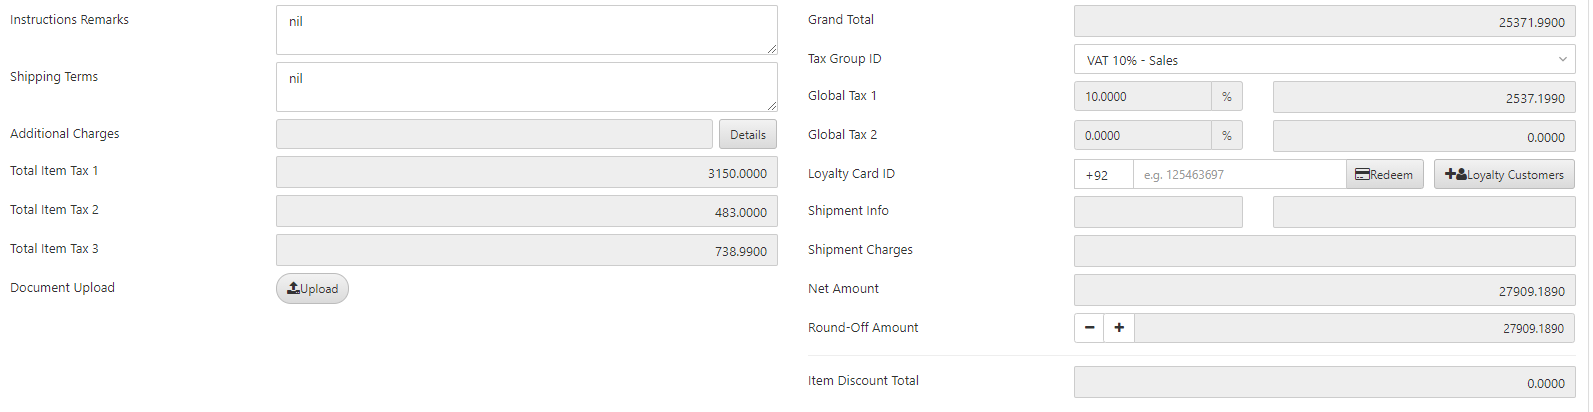
ملاحظات التعليمات: يحدد هذا الحقل الإرشادات أو التعليقات او الملاحظات.
رمز المجموعة الضريبية: يسمح هذا الحقل باختيار الضريبة الاجمالية إن وجدت.
شروط الشحن: يحدد هذا الحقل شروط وأحكام الشحن ان وجدت.
الرسوم الإضافية: يحدد هذا الحقل الرسوم الإضافية.
![]()
التفاصيل: يؤدي النقر فوق هذا الزر إلى إظهار نافذة منبثقة لإدخال تفاصيل الرسوم الاضافية.
في النافذة المنبثقة، يمكنك إضافة رسوم الخدمات والرسوم الإضافية من 1 إلى 8 جنبًا إلى جنب مع رموز العملات وأسعار العملات، وبالتالي إضافة هذه الرسوم إلى إجمالي المبلغ الصافي.
معرف بطاقة الولاء: في حالة عميل الولاء، تقوم بإدخال معرف بطاقة الولاء إذا كان العميل يريد استخدامه في فاتورة المبيعات. يجب عليك إدخال رقم هاتف العميل كمعرف بطاقة ولاء.
![]()
استرداد: بالنقر فوق هذا الزر، يمكنك الاستفادة من نقاط ولاء العميل.
ولاء العملاء: بالنقر فوق هذا الزر يمكنك إضافة عملاء الولاء.
ملاحظة: يمكنك إضافة عميل الولاء عن طريق إدخال البلد ورقم الهاتف والبريد الإلكتروني والمعرف. يجب أن يكون رقم الهاتف فريدًا. مطلوب كلمة مرور لمرة واحدة (OTP) للتحقق من رقم الهاتف الصحيح لمستخدم بطاقة الولاء.
جبر المبلغ: يمكنك تقريب المبلغ بالنقر فوق الزر “+” أو “-“.
ملاحظة: في كل مرة يتم فيها النقر الزر + أو -، يتم تقريب المبلغ على التوالي. والغرض من ذلك هو الحصول على مبلغ بدون كسر عشري يمكن دفعه
الباقي – المدفوع: هذا هو المبلغ الذي يدفعه العميل.
قيمة الرصيد: هذا هو المبلغ المتبقي من النقدية ليتم تسليمها للعميل بعد طرح المبلغ الإجمالي للفاتورة من المبلغ المدفوع
انقر فوق الزر “حفظ” في أعلى الصفحة لحفظ المعلومات.

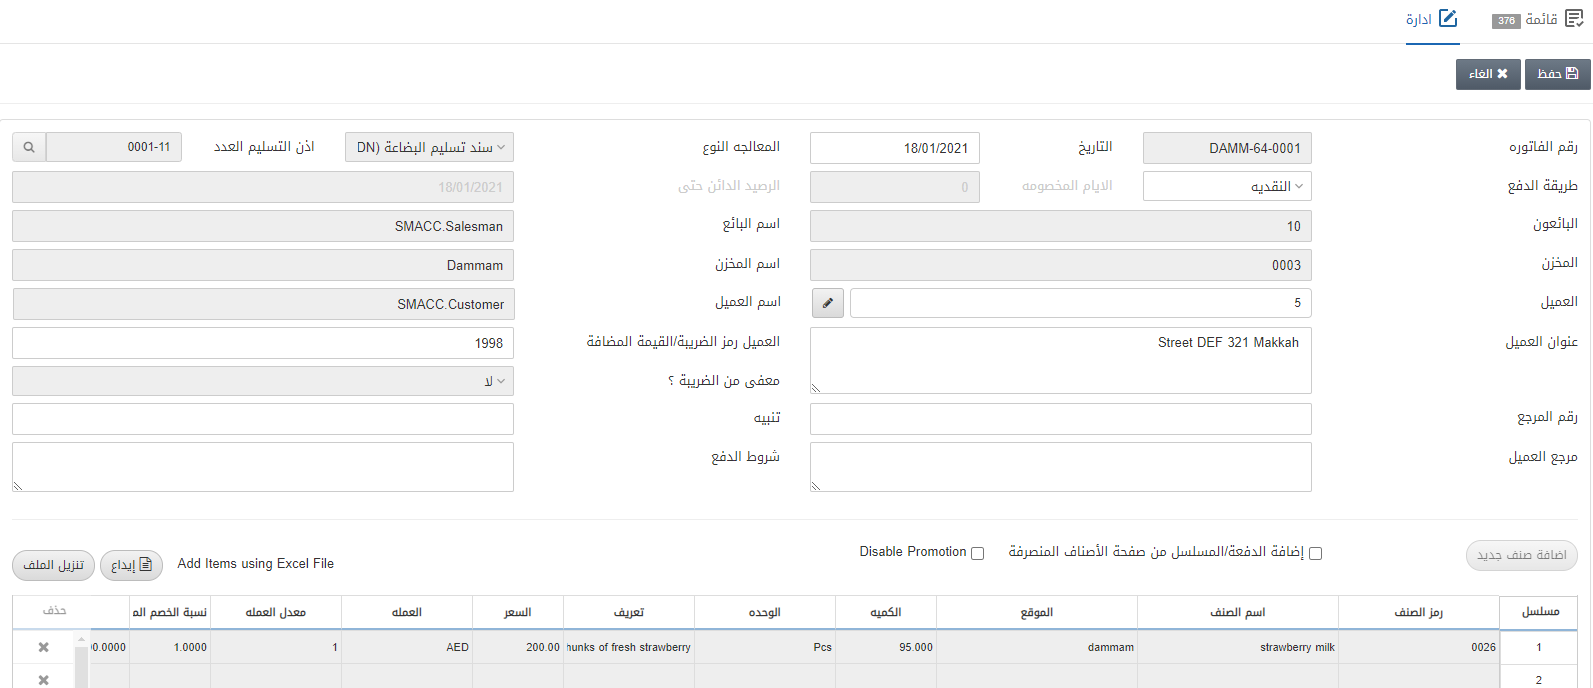
إضافة فاتورة مبيعات بواسطة سند تسليم البضاعة
لإضافة فاتورة مبيعات بواسطة سند تسليم البضاعة ، انتقل إلى المخزون> المبيعات> فاتورة المبيعات، يتم عرض صفحة فاتورة المبيعات.

![]()
انقر فوق الزر “ادارة” في الجزء العلوي من الصفحة.


رقم الفاتورة: يتم إنشاء هذا الحقل تلقائيًا.
التاريخ: يحدد هذا الحقل تاريخ فاتورة المبيعات.
المعالجة النوع: في هذا الحقل اختر سند تسليم البضاعة.
رقم المستند: ادخل رقم اذن التسليم.
طريقة الدفع: حدد النقدية في هذا الحقل. يمكنك تحديد خيار واحد من طرق دفع متعددة مثل النقدية والاجل والبنك.
الأيام المخصومة: يتم تمكين هذا الحقل في حالة تحديد الأجل كطريقة دفع. يحدد أيام أو مدة الائتمان.
الرصيد الدائن حتى: يتم تمكين هذا الحقل في حالة تحديد الأجل كطريقة دفع. يحدد تاريخ انتهاء مدة الائتمان.
البائعون: يسمح هذا الحقل باختيار بائع من القائمة المنسدلة.
اسم البائع: يتم جلب هذا الحقل تلقائيًا بواسطة النظام.
المخزن: يسمح هذا الحقل باختيار المخزن من القائمة المنسدلة ويظهر بشكل تلقائي في حالة ربط البائع بمخزن معين.
اسم المخزن: يتم جلب هذا الحقل تلقائيًا بواسطة النظام بناءً على رمز المخزن.
العميل: يسمح هذا الحقل باختيار العميل من القائمة المنسدلة.
انشاء العميل: يتيح هذا الزر الموجود أمام حقل العميل إضافة عميل جديد من خلال إظهار نافذة منبثقة.
![]()
في النافذة المنبثقة أعلاه، تحتاج إلى إدخال اسم العميل، والهاتف الأساسي، ورمز ضريبة القيمة المضافة / الضريبة، ورمز الحساب الرئيسي، وحقل كود حساب جديد. يتم تحديد خانة الاختيار الخاصة بدعم الحساب الفرعي للسماح بالحساب الفرعي.
اسم العميل: يتم جلب هذا الحقل تلقائيًا بواسطة النظام بناءً على رمز العميل.
عنوان العميل: يحدد هذا الحقل العنوان الفعلي للعميل.
مورد رمز الضريبة/القيمة المضافة: يتم جلب هذا الحقل تلقائيًا بواسطة النظام بناءً على رمز العميل، كما يمكن إدخاله يدويًا.
معفى من الضريبة؟: يتم أيضًا جلب هذا الحقل تلقائيًا بواسطة النظام بناءً على رمز العميل.
رقم المرجع: يحدد هذا الحقل الرقم المرجعي لهذا المستند.
تنبيه: يعيّن هذا الحقل الرسالة أو التعليق او أي ملاحظات اخرى.
مرجع العميل: يحدد هذا الحقل المرجع للعميل.
شروط الدفع: يحدد هذا الحقل شروط وأحكام الدفع، إن وجدت.
![]()
انقر فوق الزر “بحث” أمام رقم اذن التسليم.
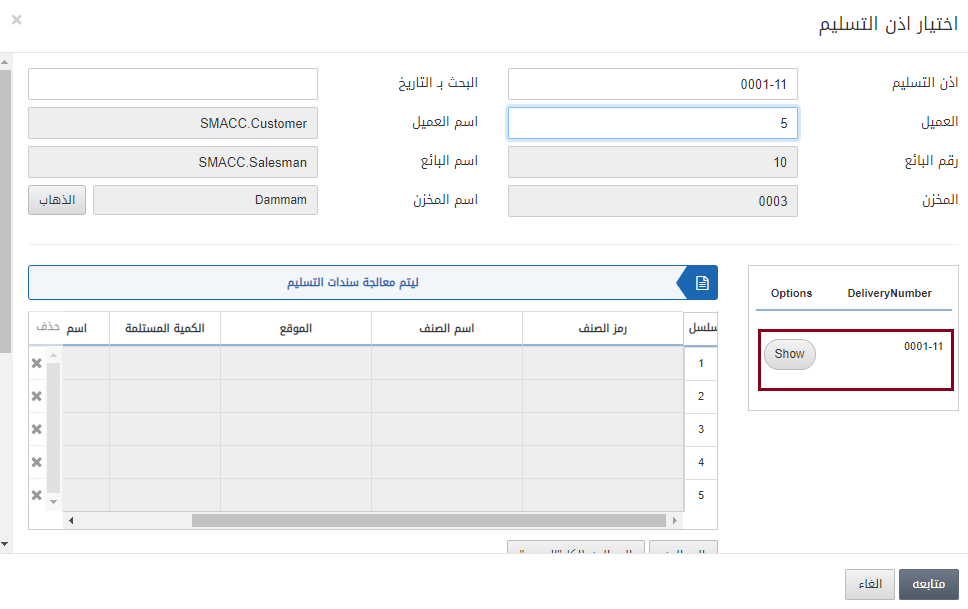
انقر فوق الزر “عرض” وأدخل الكمية للأصناف.
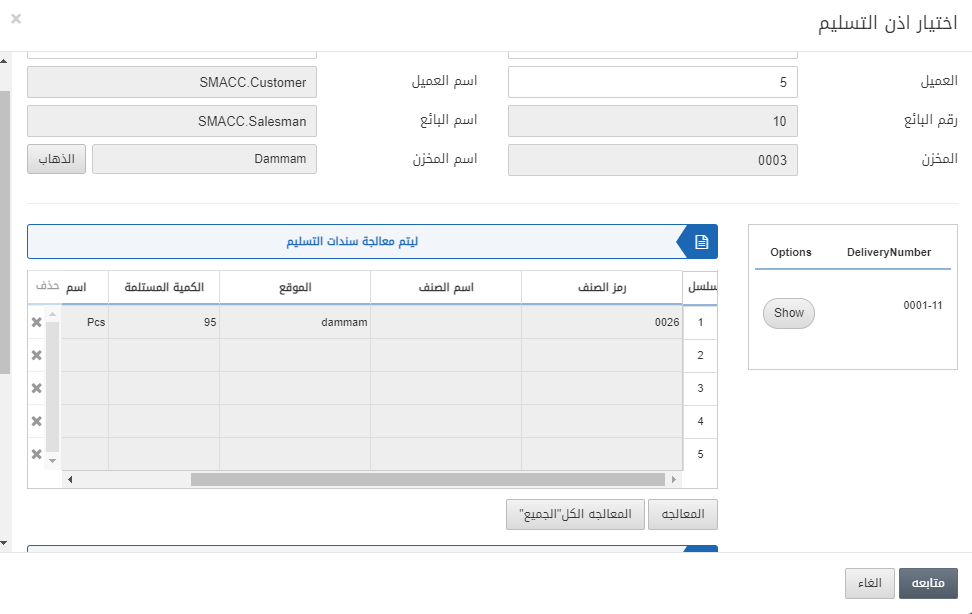
انقر فوق الزر “المعالجة الكل. الجميع” لمعالجة الاصناف المضافة.
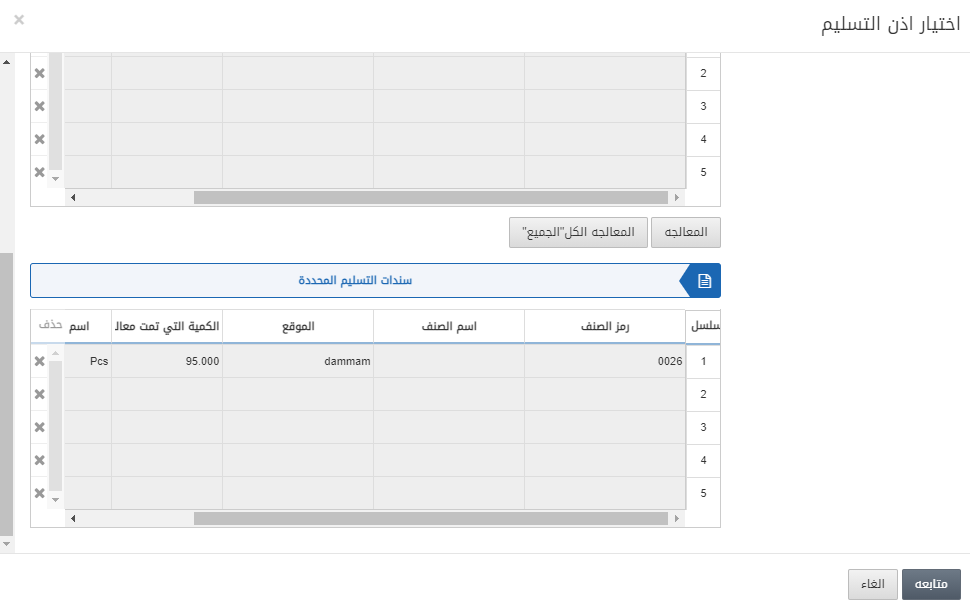
انقر فوق الزر “متابعة” لحفظ المعلومات.

ملاحظات التعليمات: يحدد هذا الحقل الإرشادات أو التعليقات او الملاحظات.
رمز المجموعة الضريبية: يسمح هذا الحقل باختيار الضريبة الاجمالية إن وجدت.
شروط الشحن: يحدد هذا الحقل شروط وأحكام الشحن ان وجدت.
الرسوم الإضافية: يحدد هذا الحقل الرسوم الإضافية.
![]()
التفاصيل: يؤدي النقر فوق هذا الزر إلى إظهار نافذة منبثقة لإدخال تفاصيل الرسوم الاضافية.
في النافذة المنبثقة، يمكنك إضافة رسوم الخدمات والرسوم الإضافية من 1 إلى 8 جنبًا إلى جنب مع رموز العملات وأسعار العملات، وبالتالي إضافة هذه الرسوم إلى إجمالي المبلغ الصافي.
معرف بطاقة الولاء: في حالة عميل الولاء، تقوم بإدخال معرف بطاقة الولاء إذا كان العميل يريد استخدامه في فاتورة المبيعات. يجب عليك إدخال رقم هاتف العميل كمعرف بطاقة ولاء.![]()
استرداد: بالنقر فوق هذا الزر، يمكنك الاستفادة من نقاط ولاء العميل.
ولاء العملاء: بالنقر فوق هذا الزر يمكنك إضافة عملاء الولاء.
ملاحظة: يمكنك إضافة عميل الولاء عن طريق إدخال البلد ورقم الهاتف والبريد الإلكتروني والمعرف. يجب أن يكون رقم الهاتف فريدًا. مطلوب كلمة مرور لمرة واحدة (OTP) للتحقق من رقم الهاتف الصحيح لمستخدم بطاقة الولاء.
جبر المبلغ: يمكنك تقريب المبلغ بالنقر فوق الزر “+” أو “-“.
ملاحظة: في كل مرة يتم فيها النقر الزر + أو -، يتم تقريب المبلغ على التوالي. والغرض من ذلك هو الحصول على مبلغ بدون كسر عشري يمكن دفعه
الباقي – المدفوع: هذا هو المبلغ الذي يدفعه العميل.
قيمة الرصيد: هذا هو المبلغ المتبقي من النقدية ليتم تسليمها للعميل بعد طرح المبلغ الإجمالي للفاتورة من المبلغ المدفوع
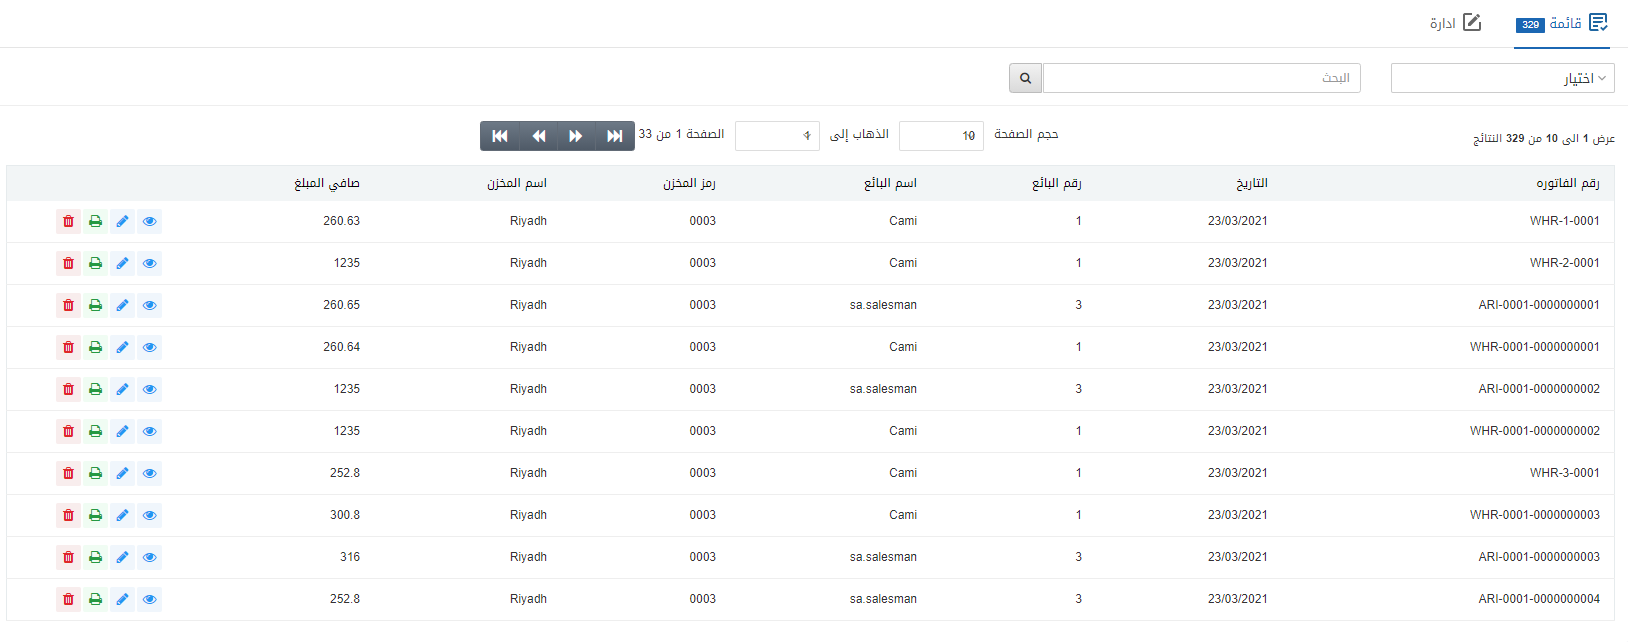
تعديل فاتورة المبيعات
لتعديل فاتورة المبيعات، انتقل إلى المخزون> المبيعات> فاتورة المبيعات، يتم عرض صفحة فاتورة المبيعات.
حدد المستند المطلوب من القائمة.
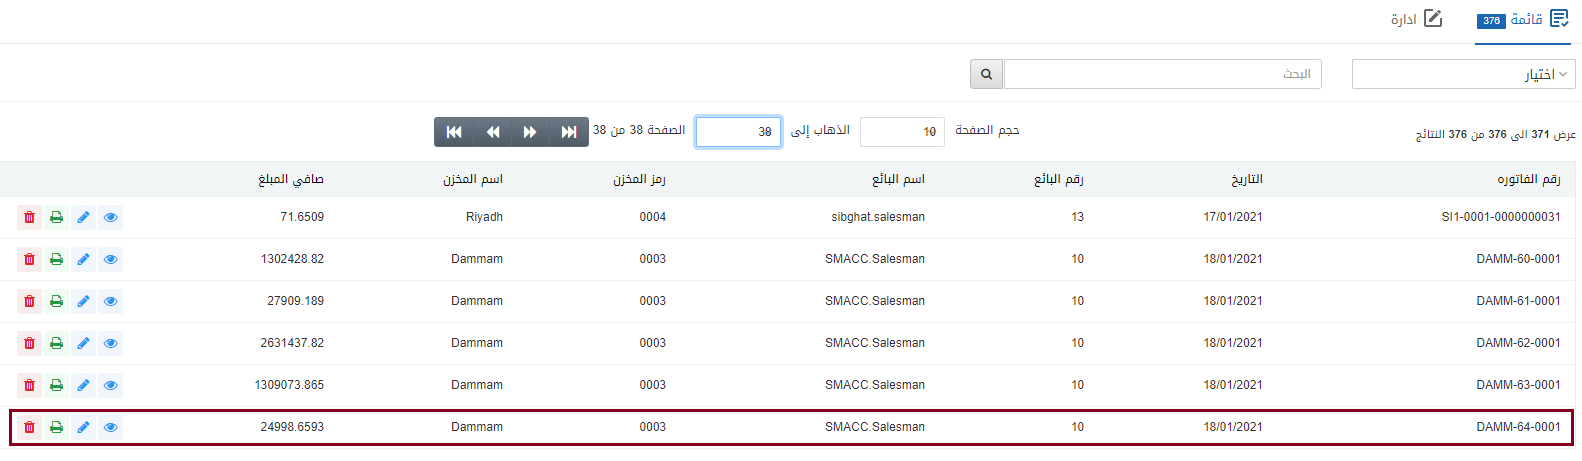
توجد اربعة رموز أمام كل صف وهي معاينة وتعديل وطباعة وحذف.
![]()
انقر على ايقونة “تعديل” رمز القلم لتعديل البيانات.
يمكنك تحديث البيانات وحفظ المعلومات.
حذف فاتورة المبيعات
لحذف فاتورة المبيعات، انتقل إلى المخزون> المبيعات> فاتورة المبيعات، يتم عرض صفحة فاتورة المبيعات.
حدد المستند المطلوب من القائمة.
توجد اربعة رموز أمام كل صف وهي معاينة وتعديل وطباعة وحذف.
![]()
انقر على ايقونة “حذف” رمز السلة لحذف البيانات.

انقر فوق الزر “نعم” لتأكيد الحذف.
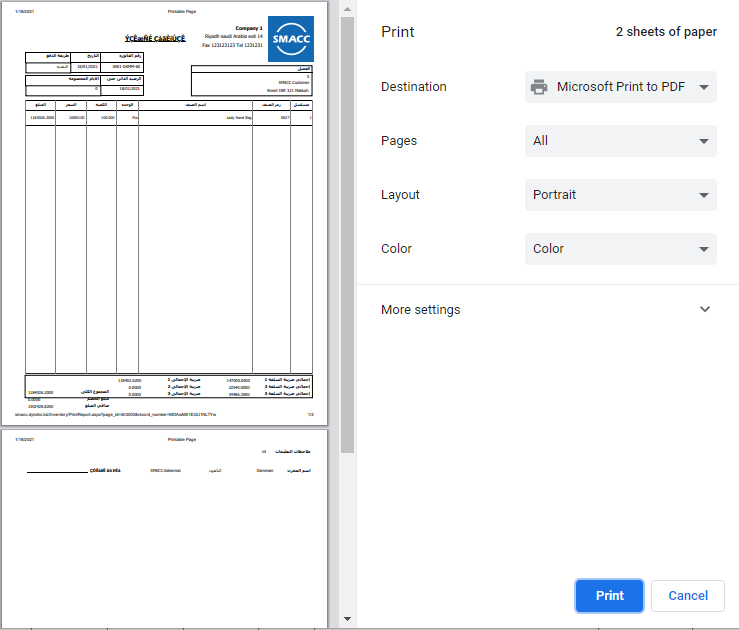
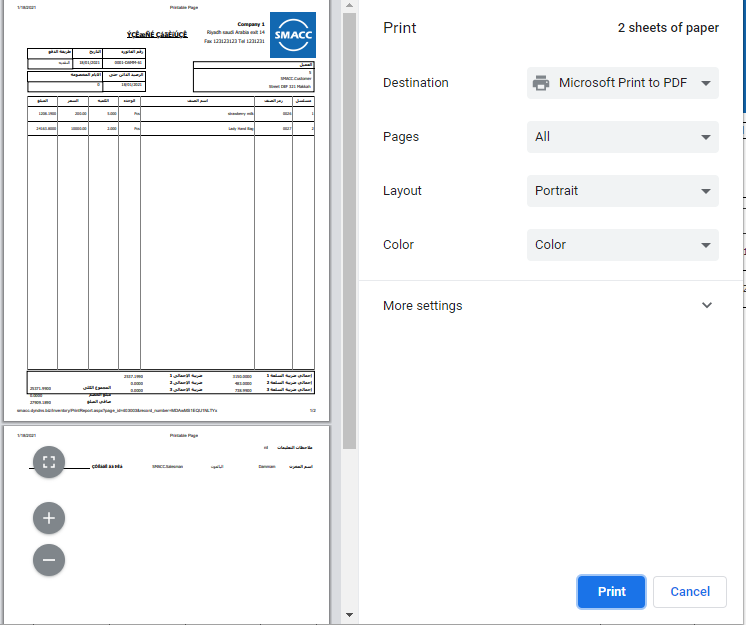
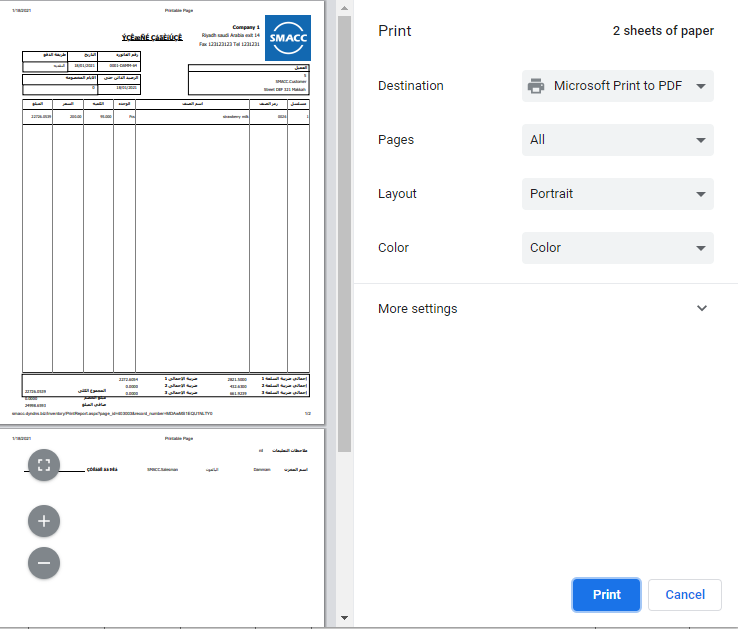
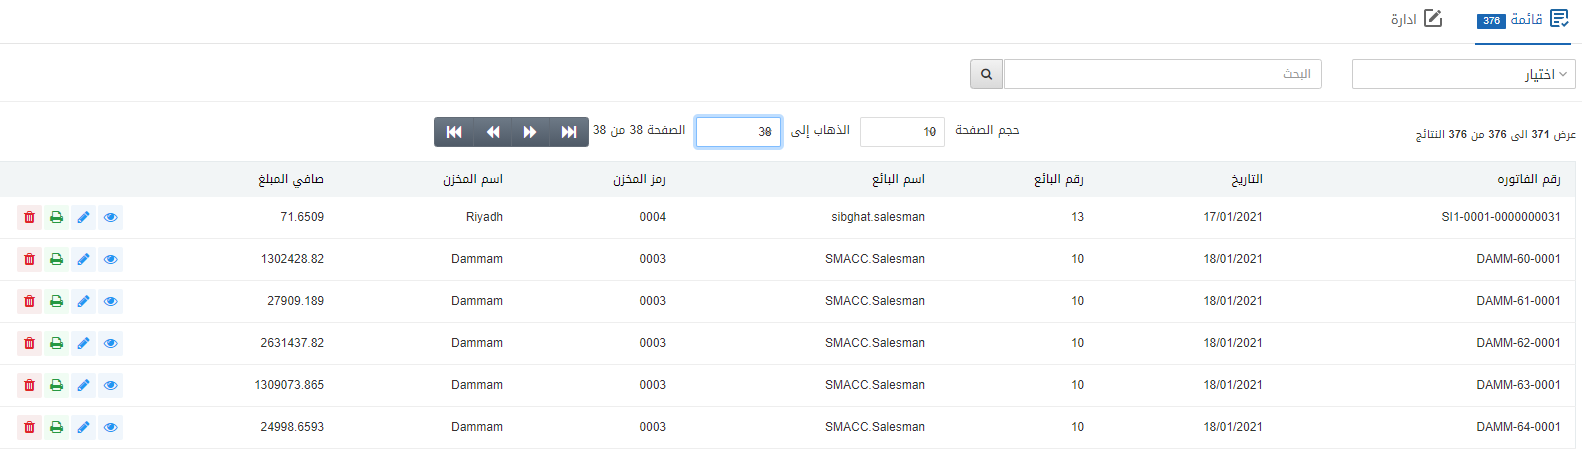
طباعة فاتورة المبيعات
لطباعة فاتورة المبيعات، انتقل إلى المخزون> المبيعات> فاتورة المبيعات، يتم عرض صفحة فاتورة المبيعات.
حدد المستند المطلوب من القائمة.
توجد اربعة رموز أمام كل صف وهي معاينة وتعديل وطباعة وحذف.
![]()
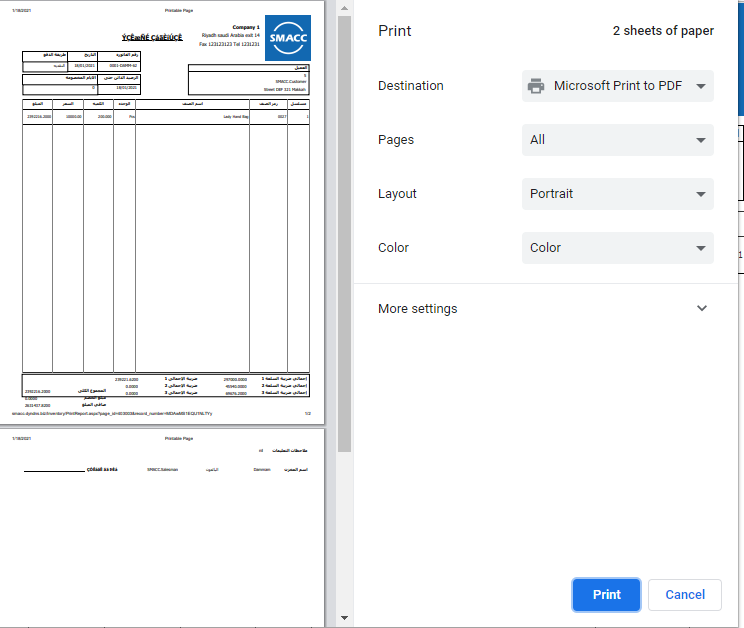
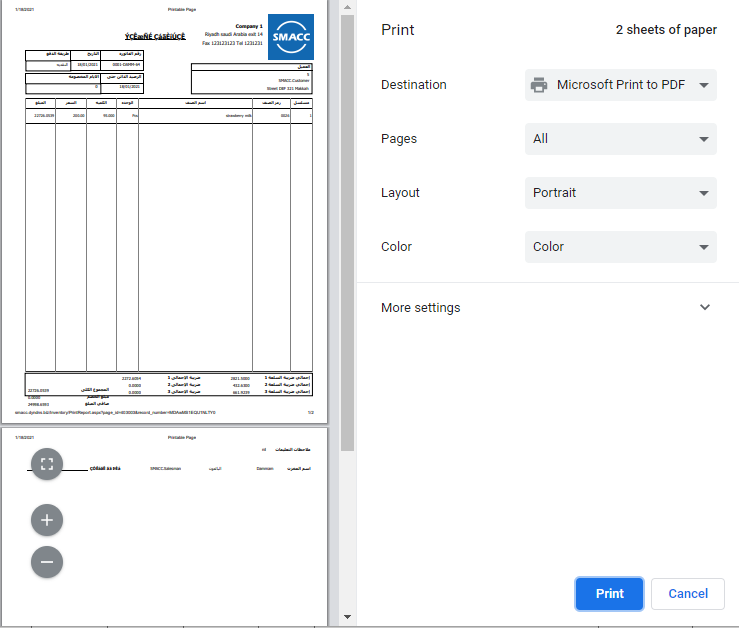
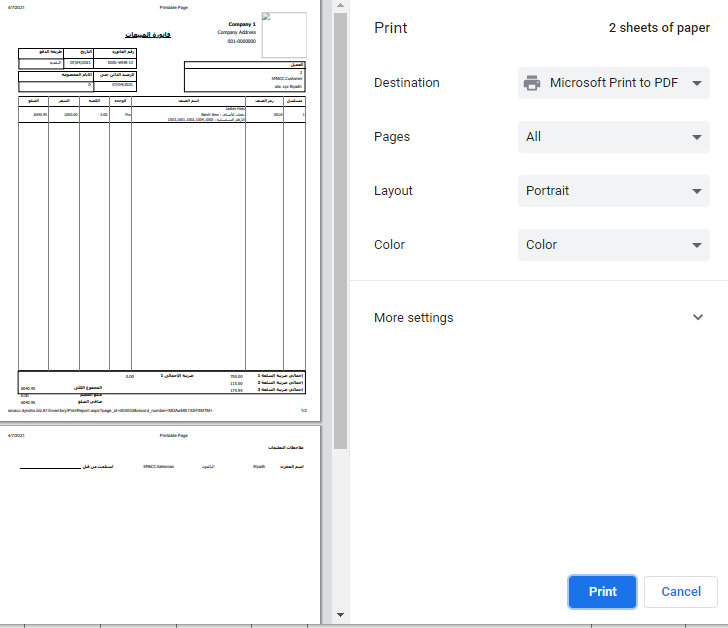
انقر على ايقونة “طباعة” رمز الطابعة لطباعة البيانات.
إدخال الدُفعات والأرقام التسلسلية
لإدخال الدُفعات والأرقام التسلسلية إلى أي فاتورة مبيعات، انتقل إلى المخزون> المبيعات> فاتورة المبيعات، يتم عرض صفحة فاتورة المبيعات
انقر فوق الزر “ادارة” في الجزء العلوي من الصفحة.
بعد إدخال جميع الحقول المطلوبة.
انقر فوق الزر “إضافة صنف جديد”.
انقر فوق الزر “إضافة صنف جديد”.
رمز الصنف: أضف الصنف مع إدخال أرقام الدُفعات والأرقام التسلسلية يدويًا. على سبيل المثال، 00450006.

قم بالتمرير لأسفل في النافذة المنبثقة.
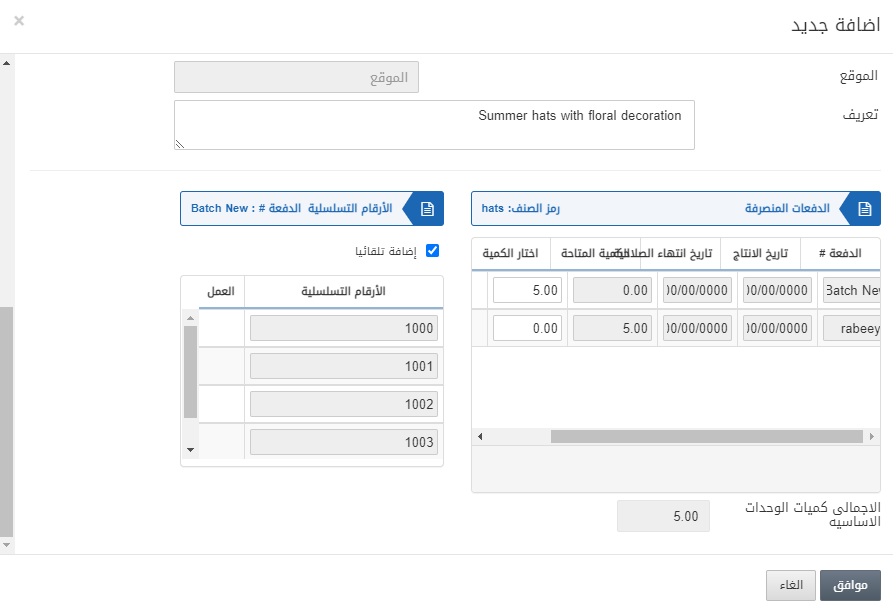
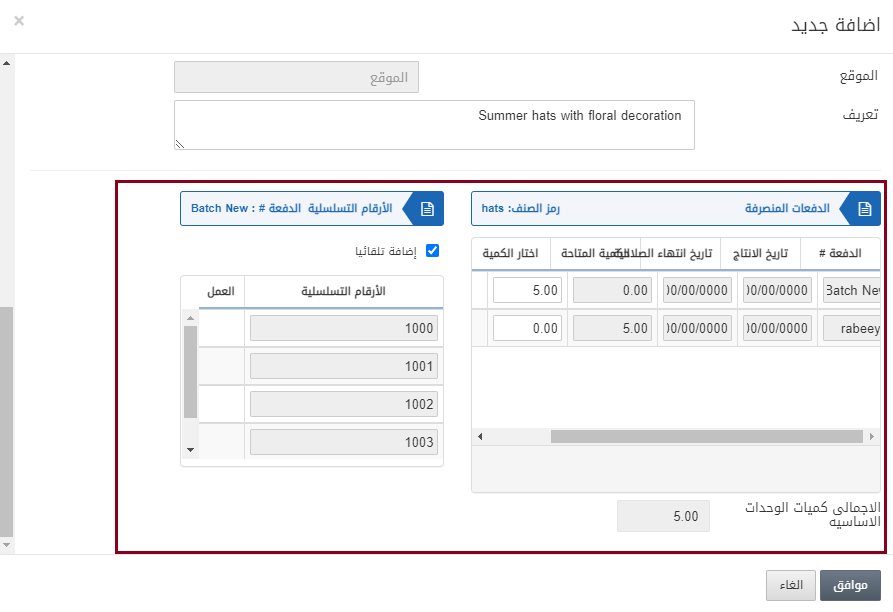

اضافة تلقائيًا: يسمح مربع الاختيار هذا عند تحديده بإضافة أو جلب الأرقام التسلسلية تلقائيًا بالتسلسل. إذا لم يتم تحديد خانة الاختيار هذه، فسيتعين عليك إضافة الأرقام التسلسلية على الأصناف المطلوبة بترتيب عشوائي حسب المتطلبات.
انقر فوق الزر “موافق “ لجلب الدُفعات والأرقام التسلسلية مقابل الصنف المحدد.

انقر فوق الزر “موافق” في الجزء العلوي من الصفحة لحفظ المعلومات.
ملحوظة: عند إصدار فاتورة المبيعات، يتم استهلاك الدُفعة والأرقام المسلسلة مقابل الصنف المحدد.