The GDN (Goods Delivery Note) includes information about any stock that is going out of inventory without any sales invoice. It can be created with and without a sales order. For example, the orders in bulk form require a GDN (Goods Delivery Note).
Adding a New GDN with Sales Order
To add a new GDN with Sales Order, go to Inventory > Sales > GDN (Goods Delivery Note), the GDN (Goods Delivery Note) page is displayed.

Click on the Manage icon at the top of the page.
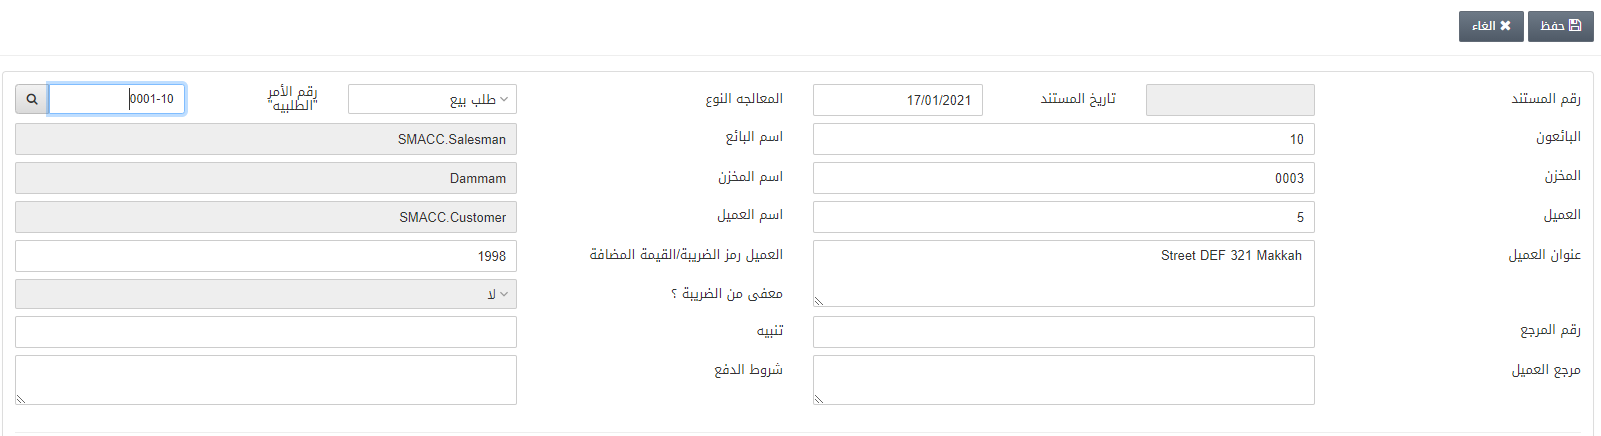
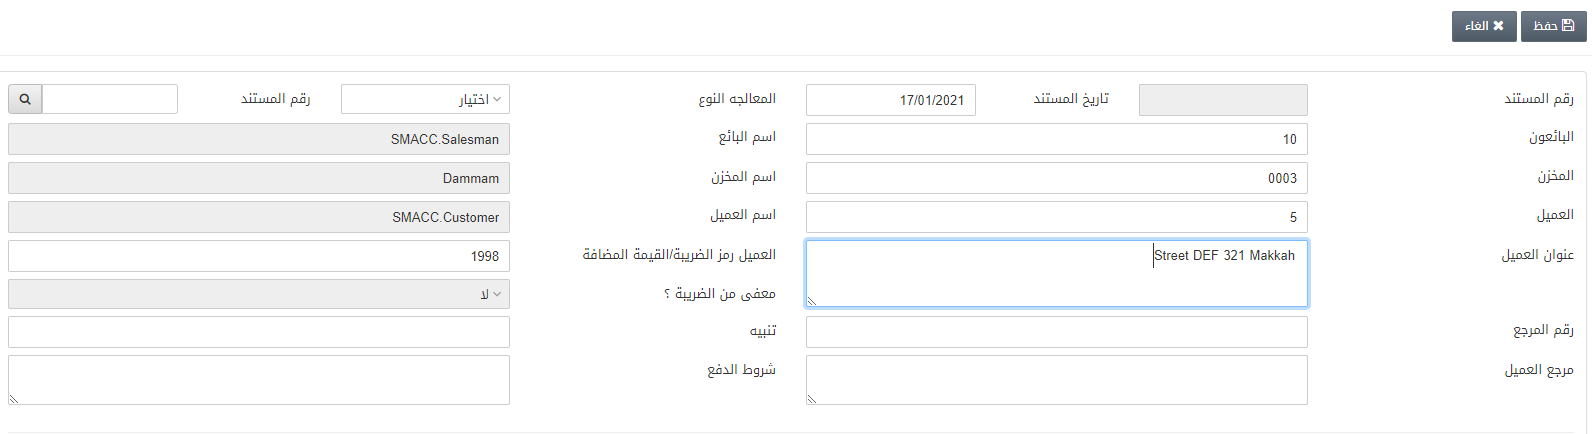
Document Number: This field is auto-generated by the system.
Document Date: This field sets the date of the GDN.
Process Type: Select the Sales order option.
Order Number: Enter the order number against which you want to create the GDN.
Salesman: This field allows the selection of Salesman code from the drop-down list.
Salesman Name: This field is auto-fetched by the system.
Warehouse: This field is also auto-fetched by the system in case it is linked with the salesman, otherwise it can be entered manually.
Warehouse Name: This field is also auto-fetched by the system based on the warehouse code.
Customer: This field allows the selection of the customer code from the drop-down list.
Customer Name: This field is also auto-fetched by the system based on the customer code.
Customer Address: This field is also auto-fetched by the system based on the customer code.
Customer VAT/Tax ID: This field is also auto-fetched by the system, otherwise can be entered manually.
Tax Exempted? This field is also auto-fetched by the system
Reference Number: This field sets the reference number for this document.
Attention: This field sets/contains the message or comment to be noticed.
Customer Reference: This field sets the reference of the customer
Payment Terms: This field sets the payment terms and conditions if any apply to the GDN.
![]()
After entering all the information in the above fields, click on the Search button of the Order Number.
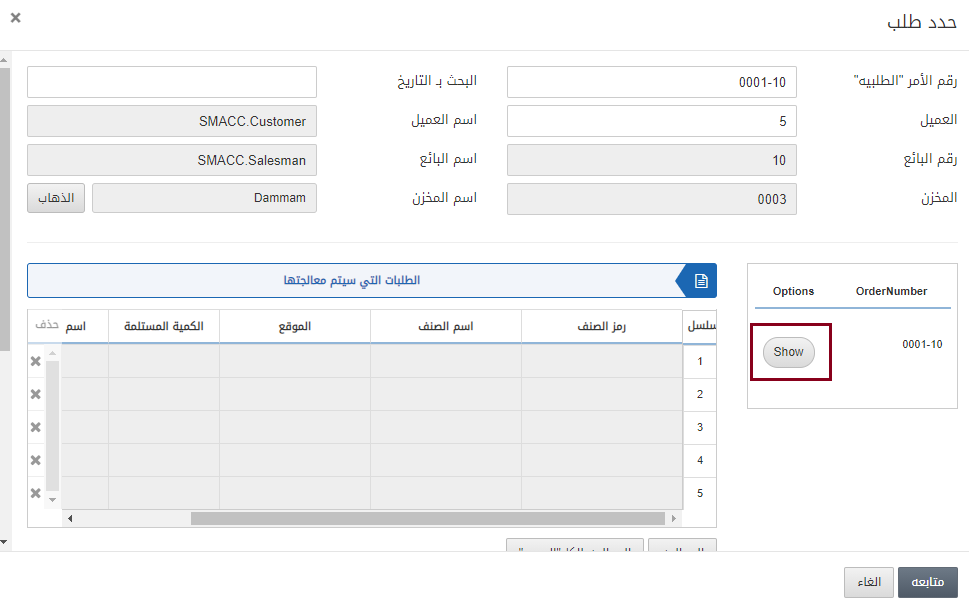
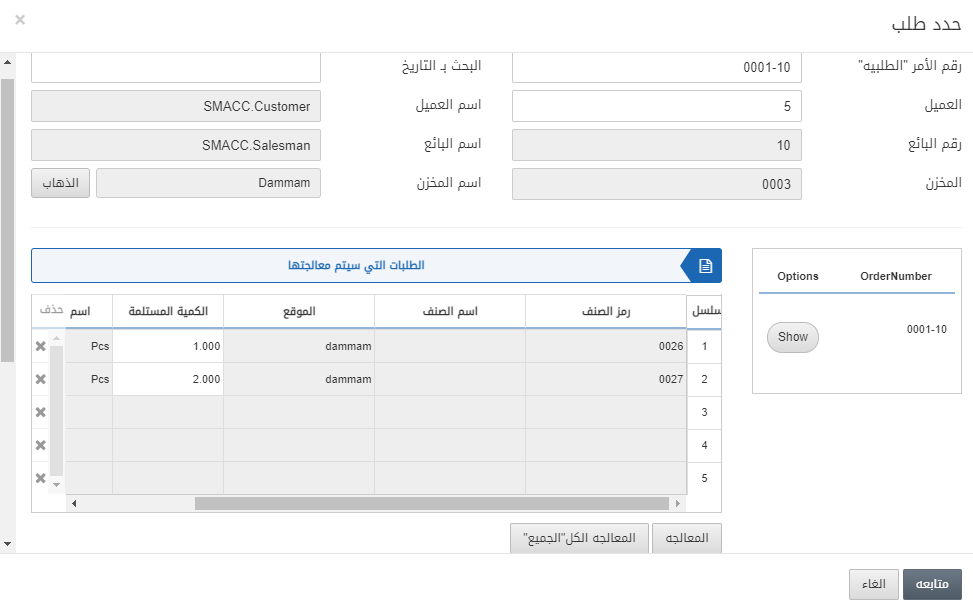
Click on the Show button under the Options and enter the Quantity of items.
Click on the Process All button.
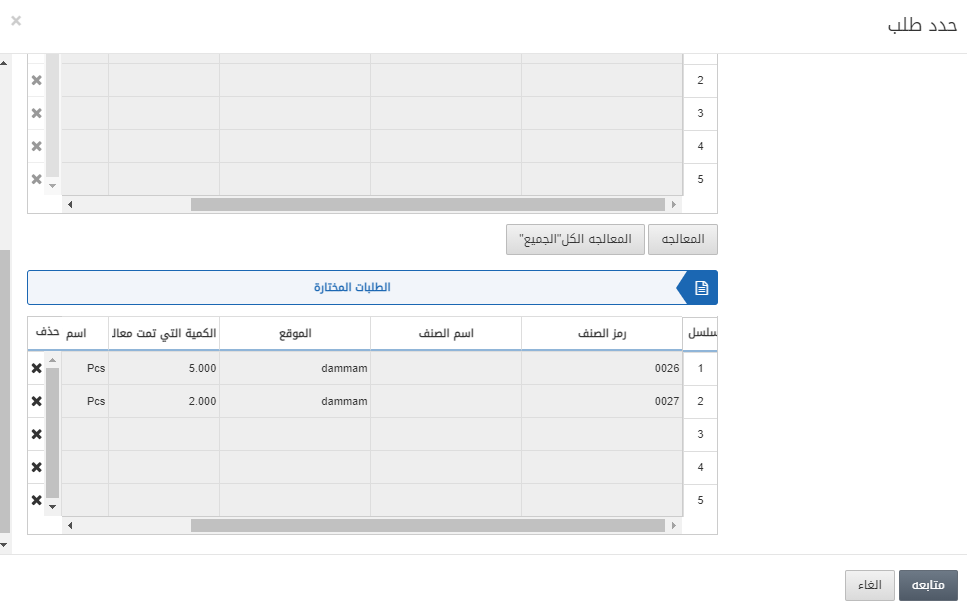
Click on the Proceed button to save the information.
Instruction Remarks: This field sets the instructions or guidelines for the GDN.
Tax Group ID: Select the Global Tax if applicable to the GDN.
Shipping Terms: This field sets the shipping terms of the GDN if applicable.
Shipment Details: This field describes the details of the shipment.
Click on the Save button at the top of the page.
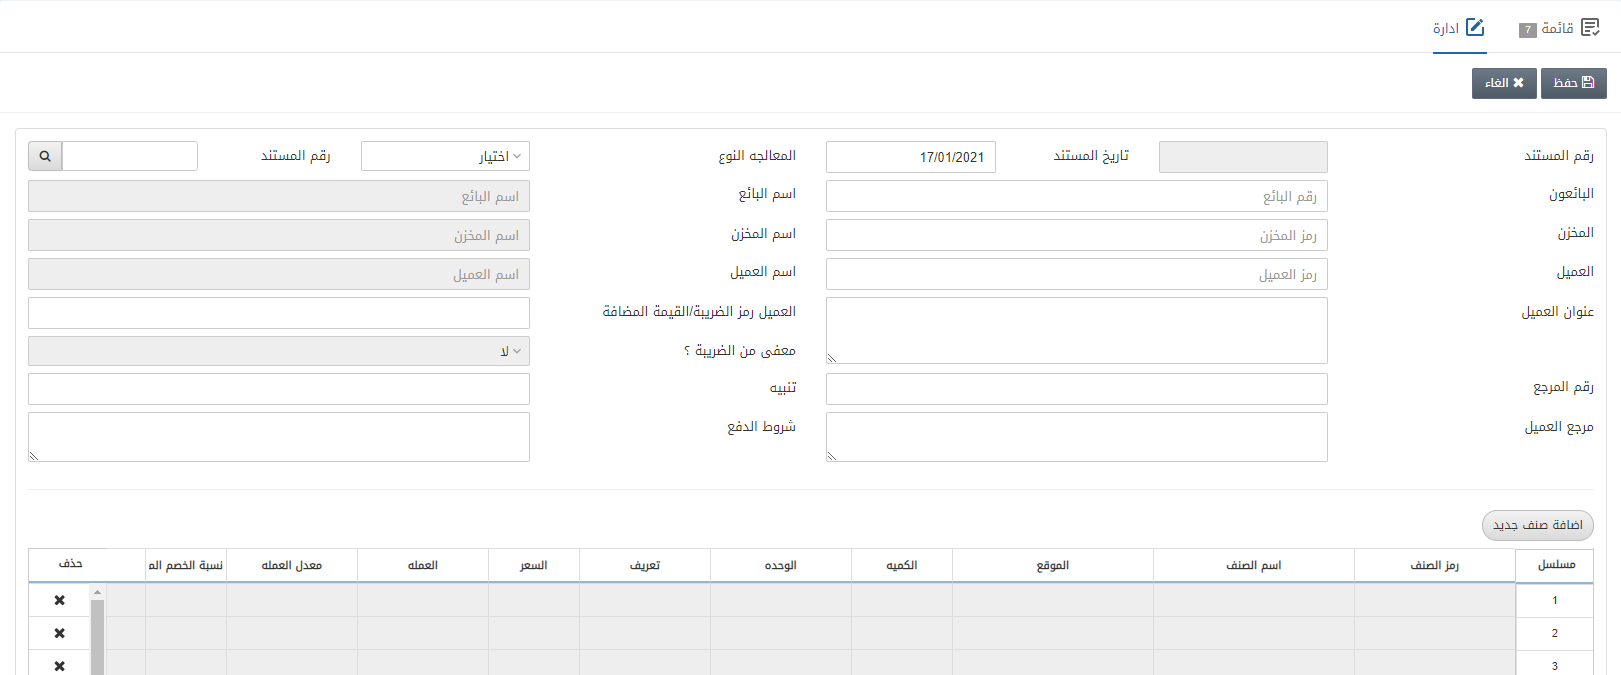
Adding a New GDN without Sales Order
To add a new GDN without Sales Order, go to Inventory > Sales > GDN (Goods Delivery Note), the GDN (Goods Delivery Note) is displayed.
Click on the Manage icon at the top of the page.

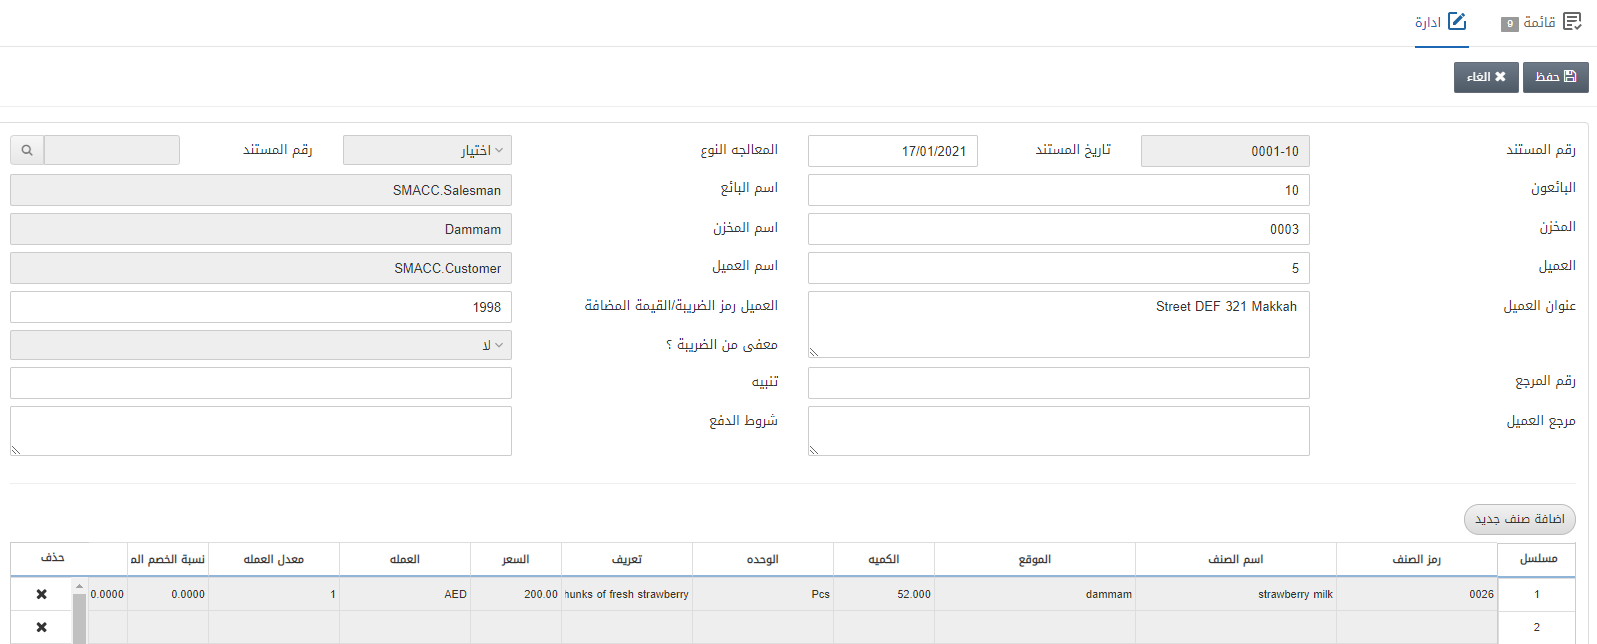
Document Number: This field is auto-generated by the system.
Document Date: This field sets the date of the GDN.
Process Type: Select the Select option.
Order Number: This field is empty.
Salesman: This field allows the selection of Salesman code from the drop-down list.
Salesman Name: This field is auto-fetched by the system.
Warehouse: This field is also auto-fetched by the system in case it is linked with the salesman, otherwise it can be entered manually.
Warehouse Name: This field is also auto-fetched by the system based on the warehouse code.
Customer: This field allows the selection of Customer code from the drop-down list.
Customer Name: This field is also auto-fetched by the system based on the customer code.
Customer Address: This field is also auto-fetched by the system based on the customer code.
Customer VAT/Tax ID: This field is also auto-fetched by the system, otherwise can be entered manually.
Tax Exempted? This field is also auto-fetched by the system
Reference Number: This field sets the reference number for this document.
Attention: This field sets/ contains the message or comment to be noticed.
Customer Reference: This field sets the reference of the customer
Payment Terms: This field sets the payment terms and conditions if any apply to the GDN.
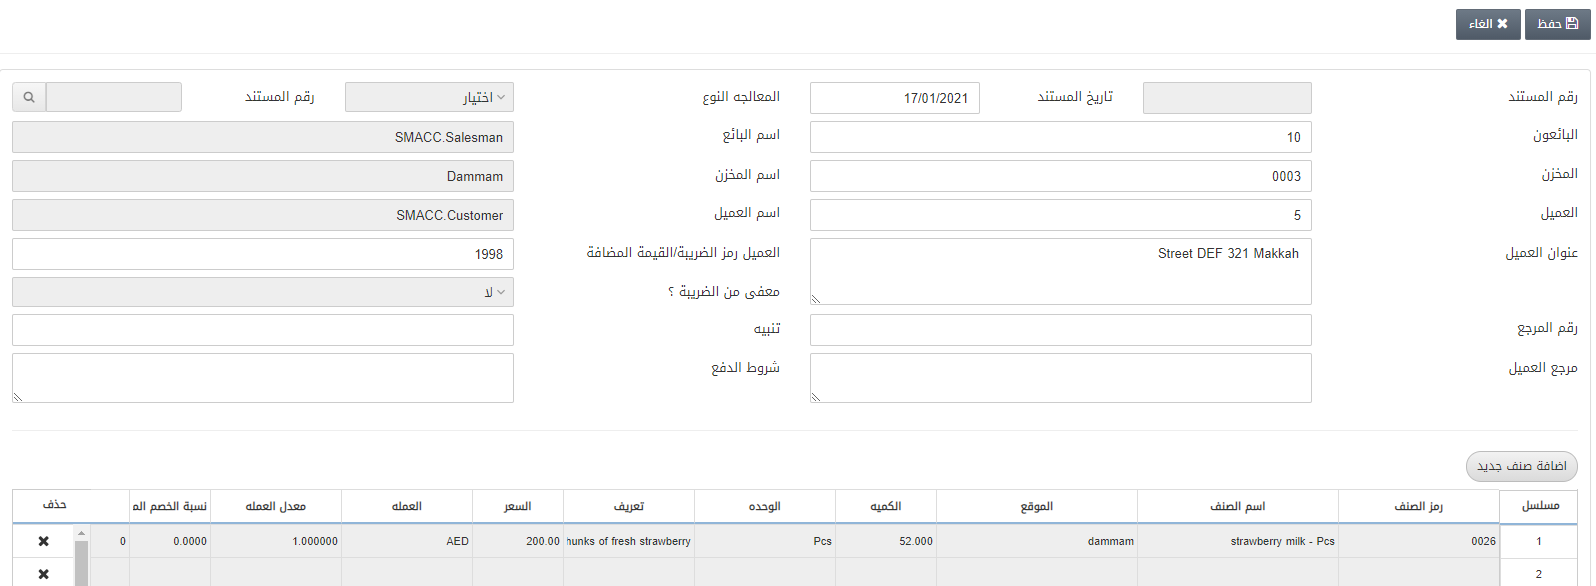
Click on the Add New Item button.
![]()
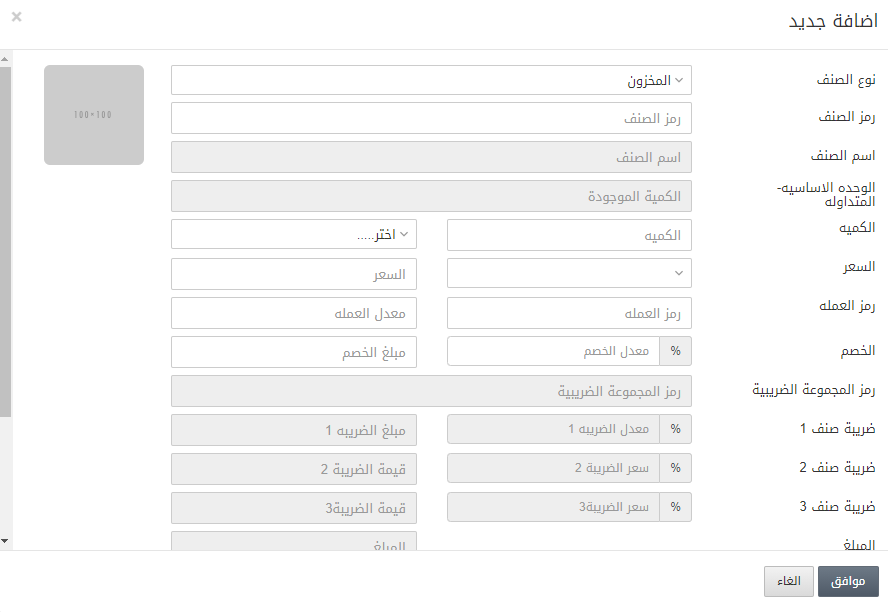
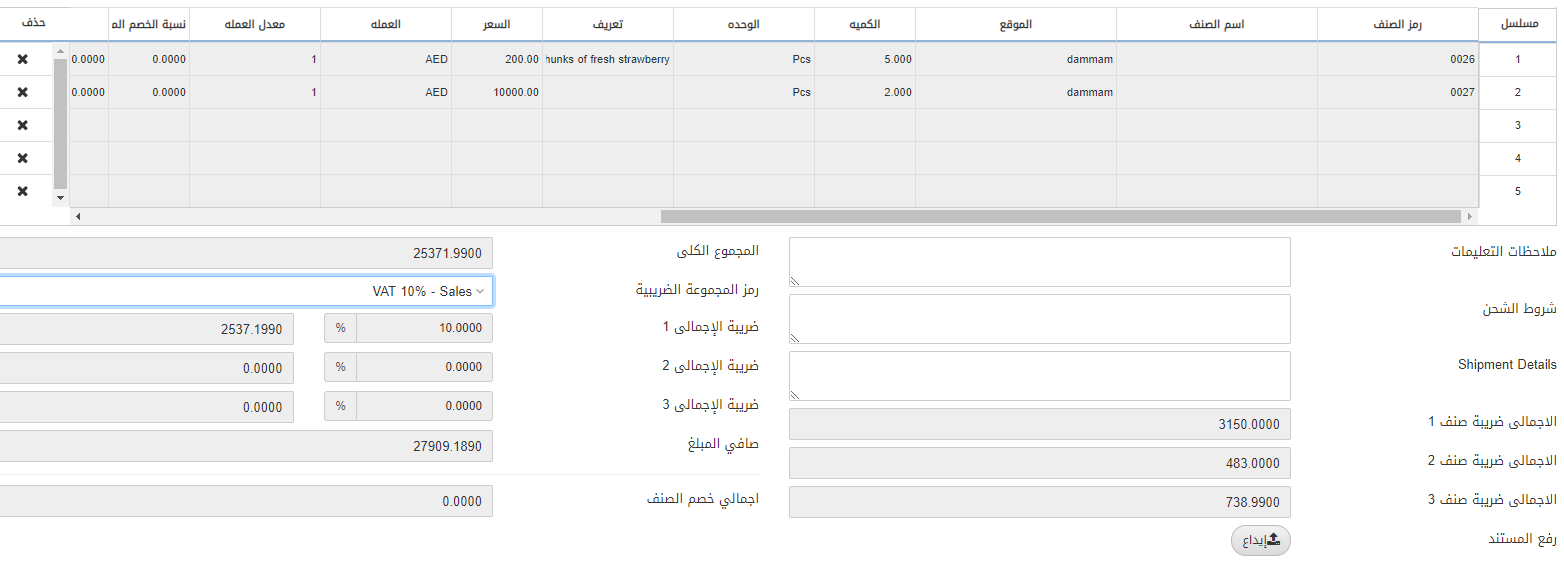
Item Type: This field selects the item type from the drop-down list. For example, you can select from Inventory, service, sales group, etc.
Item Code: This field requires the item code.
Quantity: This field sets the amount of the items. Unit: This field sets the unit type.
Price: This field sets the price channel or price type. Price amount: In front of the price, is the price amount.
Currency Code: This field sets the currency code from the drop-down list. Currency Rate: This field is auto-fetched by the system based on the currency code selection.
Discount: This field sets the discount percentage and calculates it on the item’s price.
Click on the OK button to save the information.
Instruction Remarks: This field sets the instructions or guidelines for the GDN.
Tax Group ID: Select the Global Tax if applicable to the GDN.
Shipping Terms: This field sets the shipping terms of the GDN if applicable.
Shipment Details: This field describes the details of the shipment.
Click on the Save button at the top of the page.
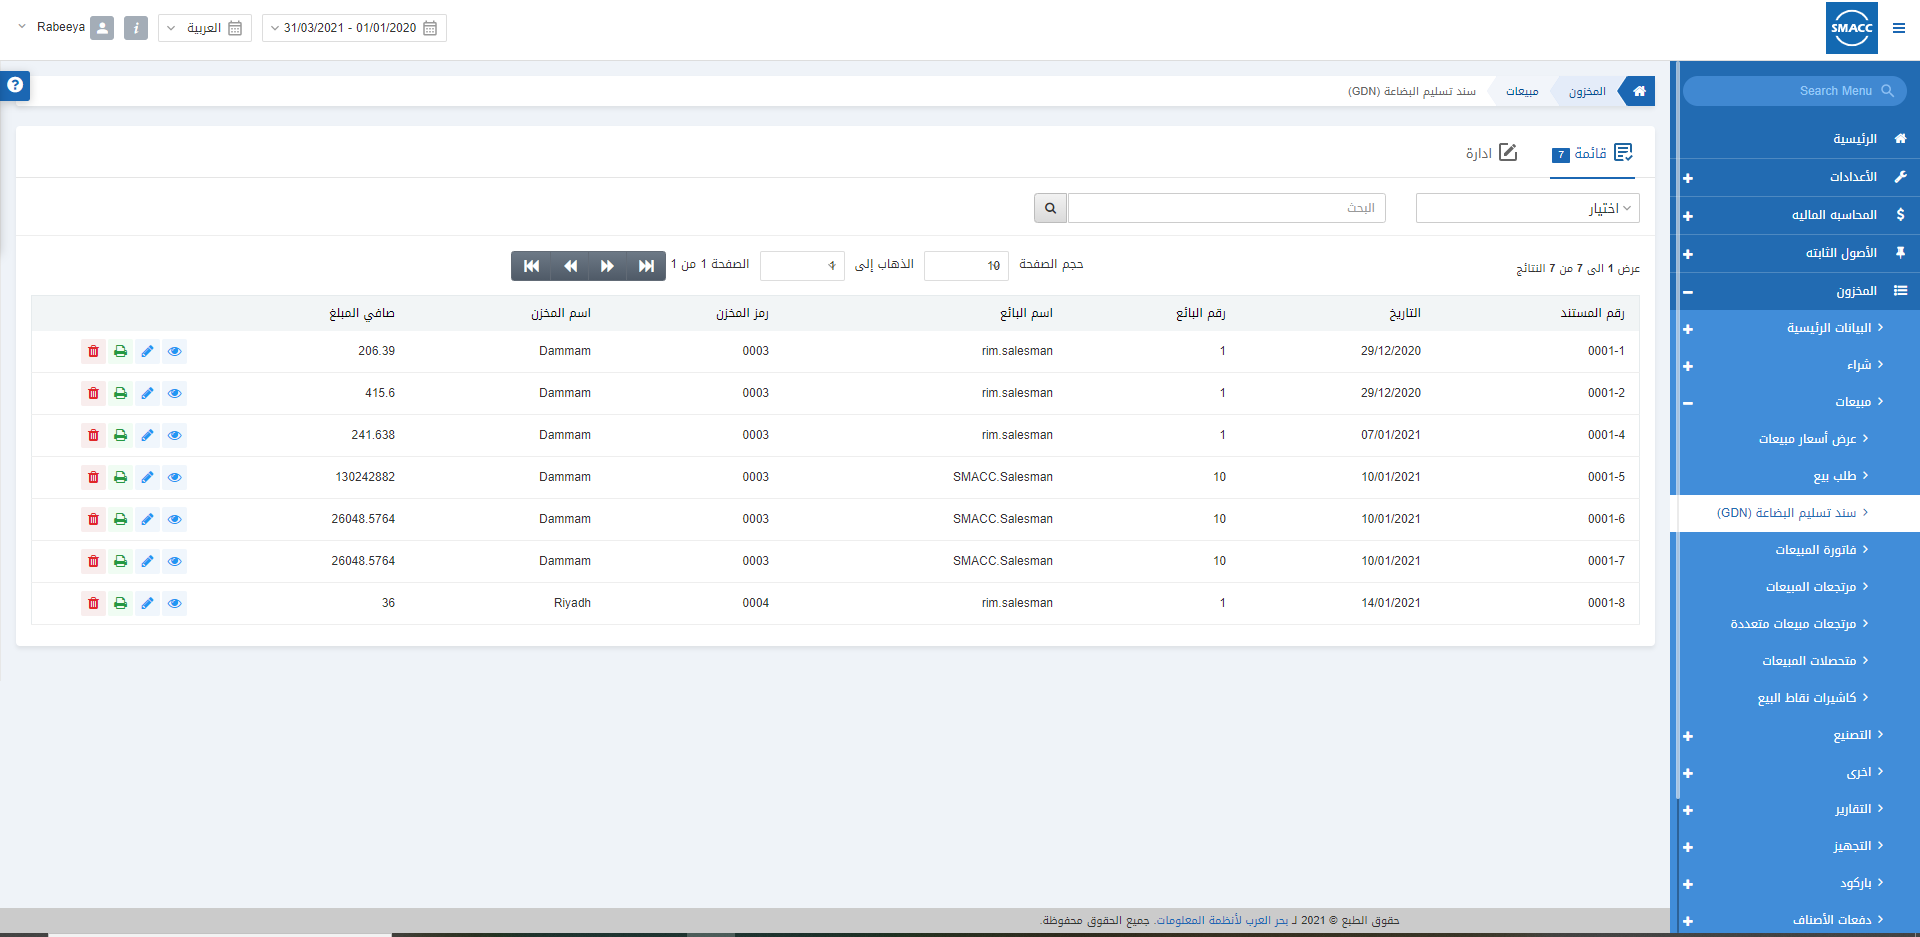
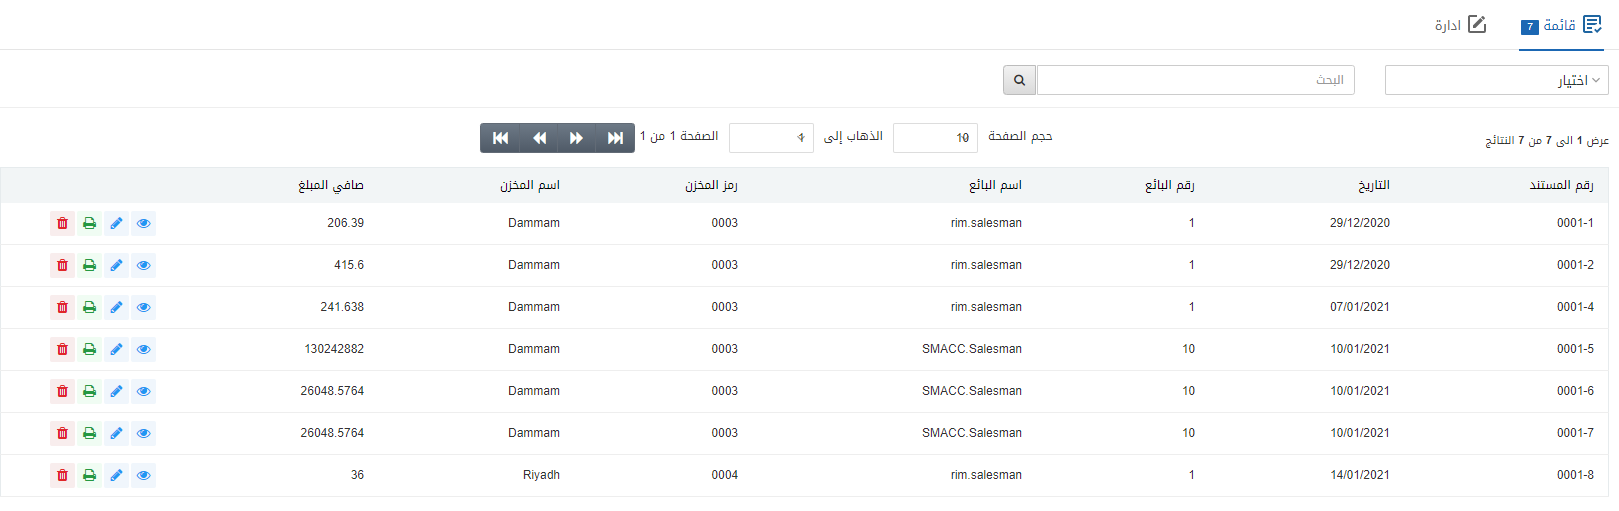
Updating the GDN
To update an already created GDN, go to Inventory > Sales > GDN (Goods Delivery Note), the GDN (Goods Delivery Note) is displayed.
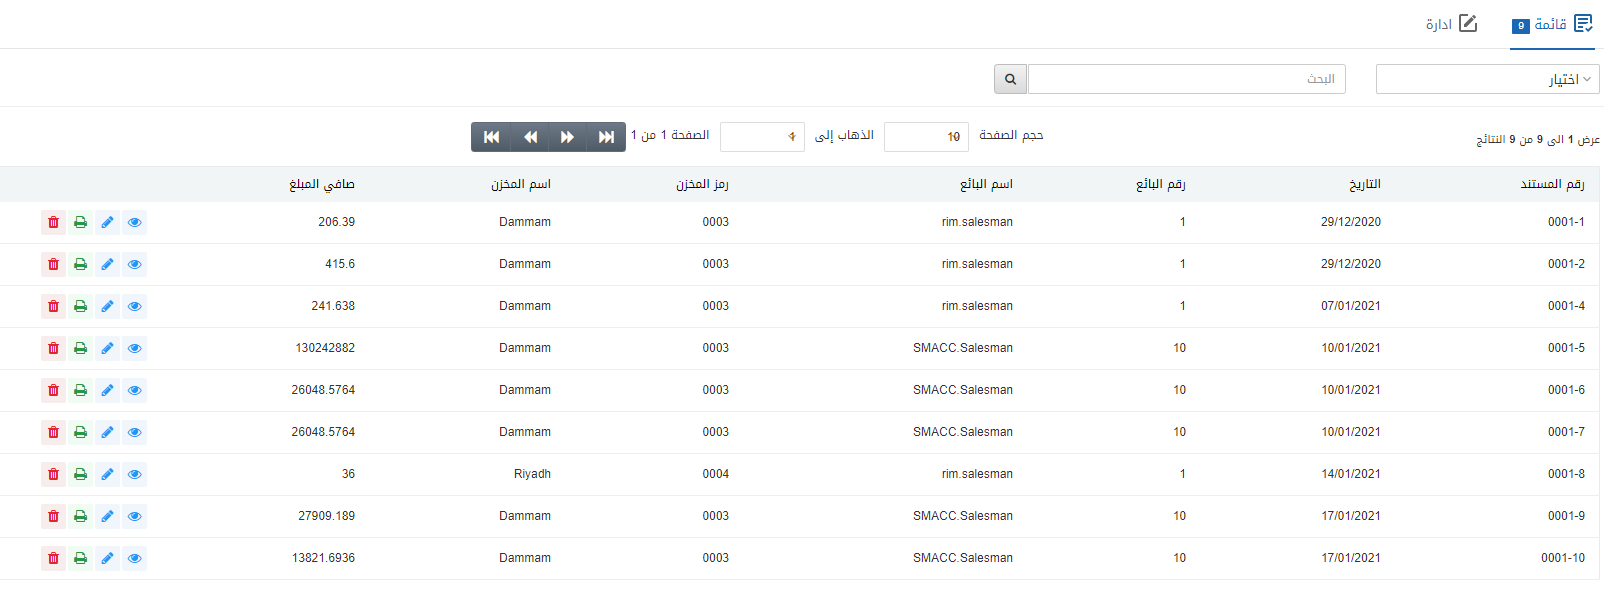
Select the desired row of the GDN.
There are four icons in front of each row that is Load, Edit, Print, and Delete.
![]()
Click on the Edit icon (blue pencil) to update the information.
You can update the information and Click on the Save button at the top of the page.
Deleting the GDN
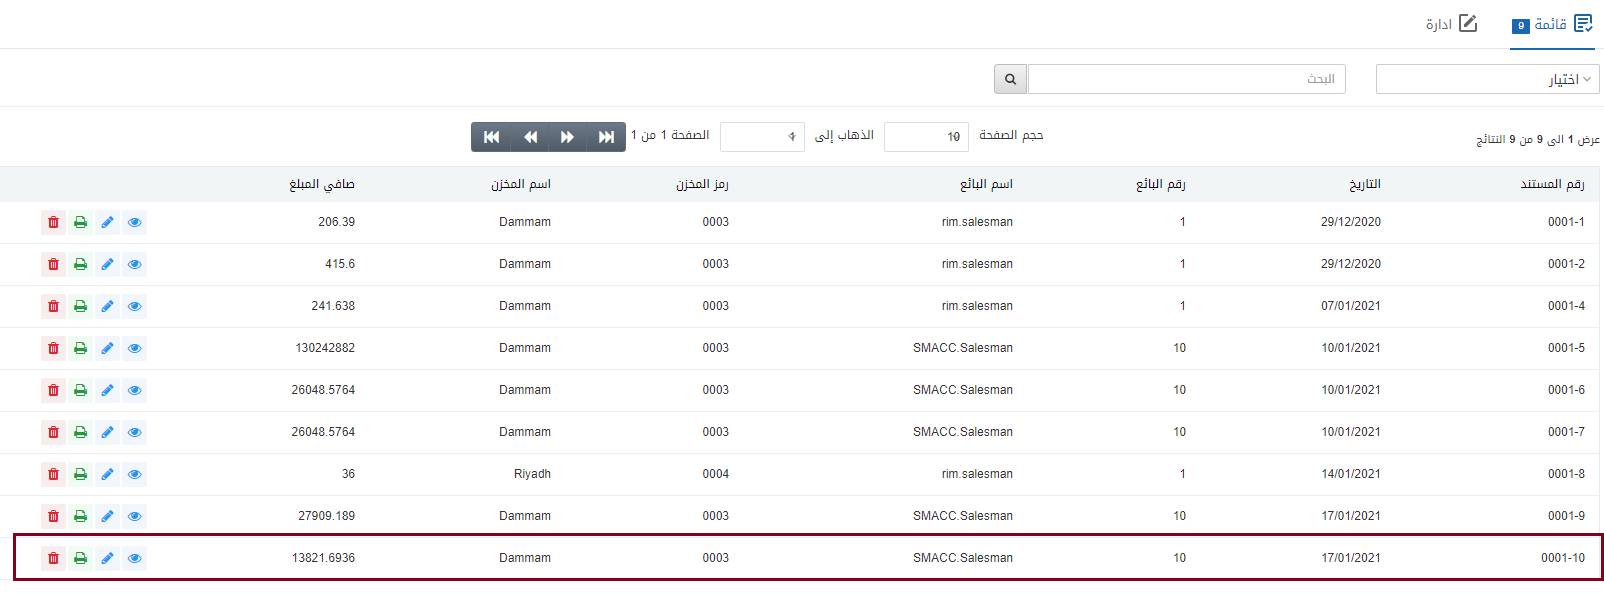
To delete a GDN, go to Inventory > Sales > GDN (Goods Delivery Note), the GDN (Goods Delivery Note) is displayed.
Select the desired row of the GDN.
There are four icons in front of each row that is Load, Edit, Print, and Delete.
![]()
Click on the Delete icon (red) to delete the information.
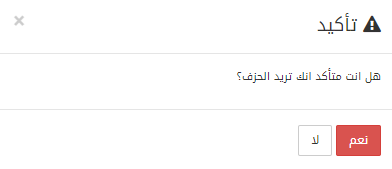
Click on the Yes button to confirm the deletion.
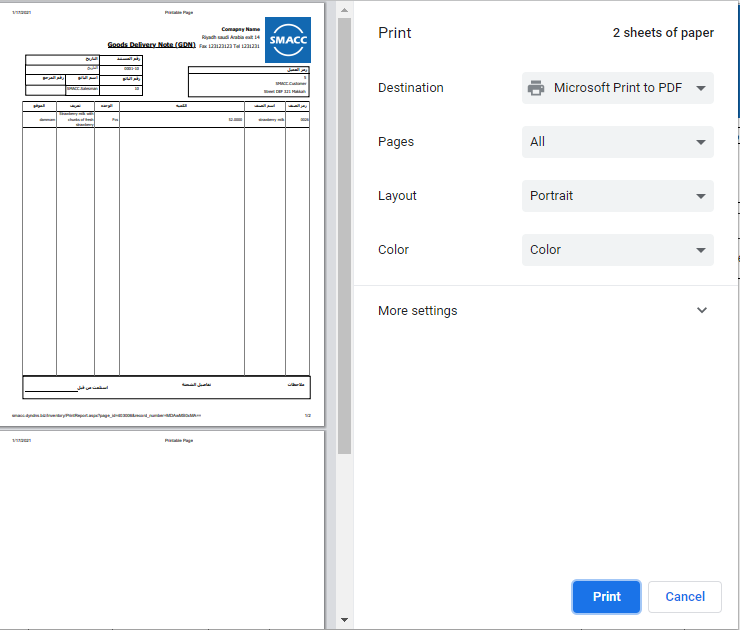
Printing the GDN
To print a GDN, go to Inventory > Sales > GDN (Goods Delivery Note), the GDN (Goods Delivery Note) is displayed.
Select the desired row of the GDN.
There are four icons in front of each row that is Load, Edit, Print, and Delete.
![]()
Click on the Print icon (green) to print the information.